1. How to Install
Install app from Shopify App Store
- Go to the Shopify App Store.
- Search for CC-Wholesale B2B Pricing.
- Open the app listing.
- Click the Install button.
- If you're not already logged in, sign in to your Shopify store.
- Shopify will display the App Permissions screen. Review the requested permissions and click Install to authorize the app.
- After installation, you will be redirected to the Plan Selection page.
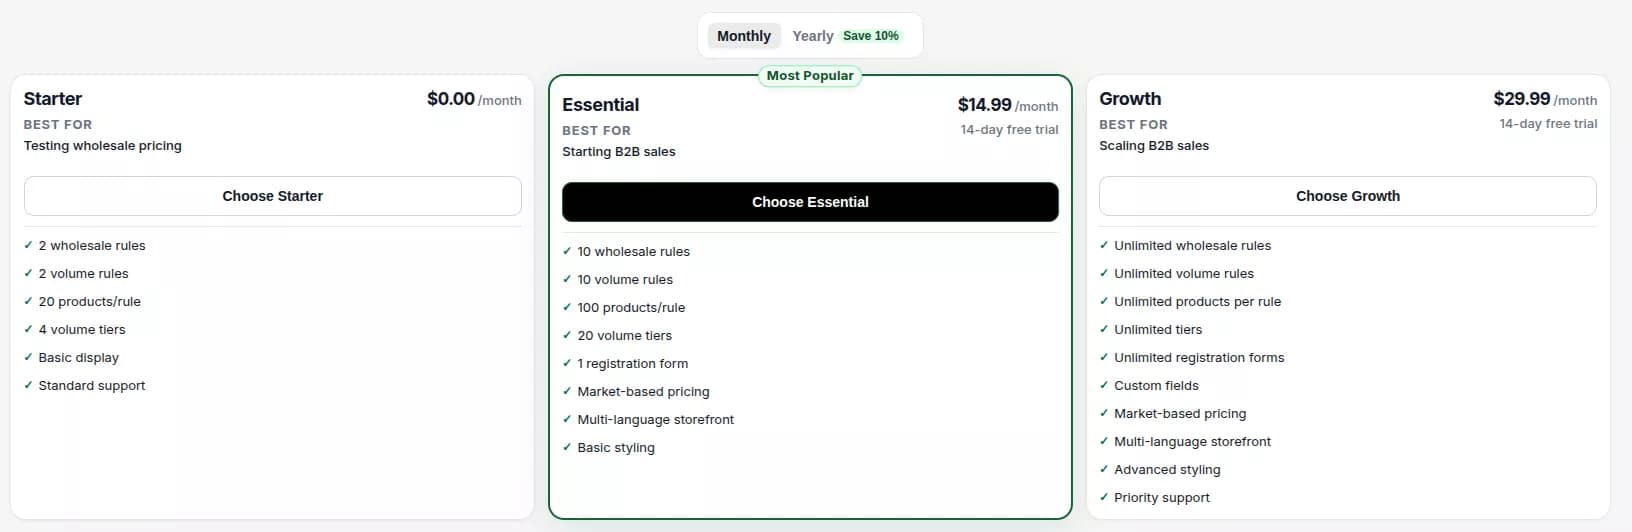
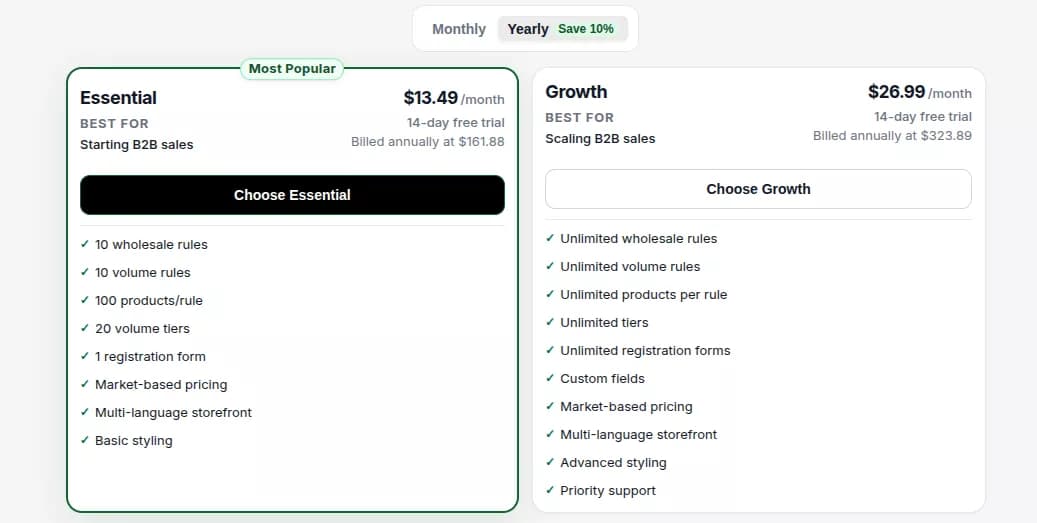
Choose the plan that best fits your business needs.
- 14-day free trial is available on all paid plans.
- A Free Plan is also available for merchants who want to get started at no cost.
Monthly Plan
Yearly Plan
- Once your plan is selected, you will be automatically redirected to the Dashboard.
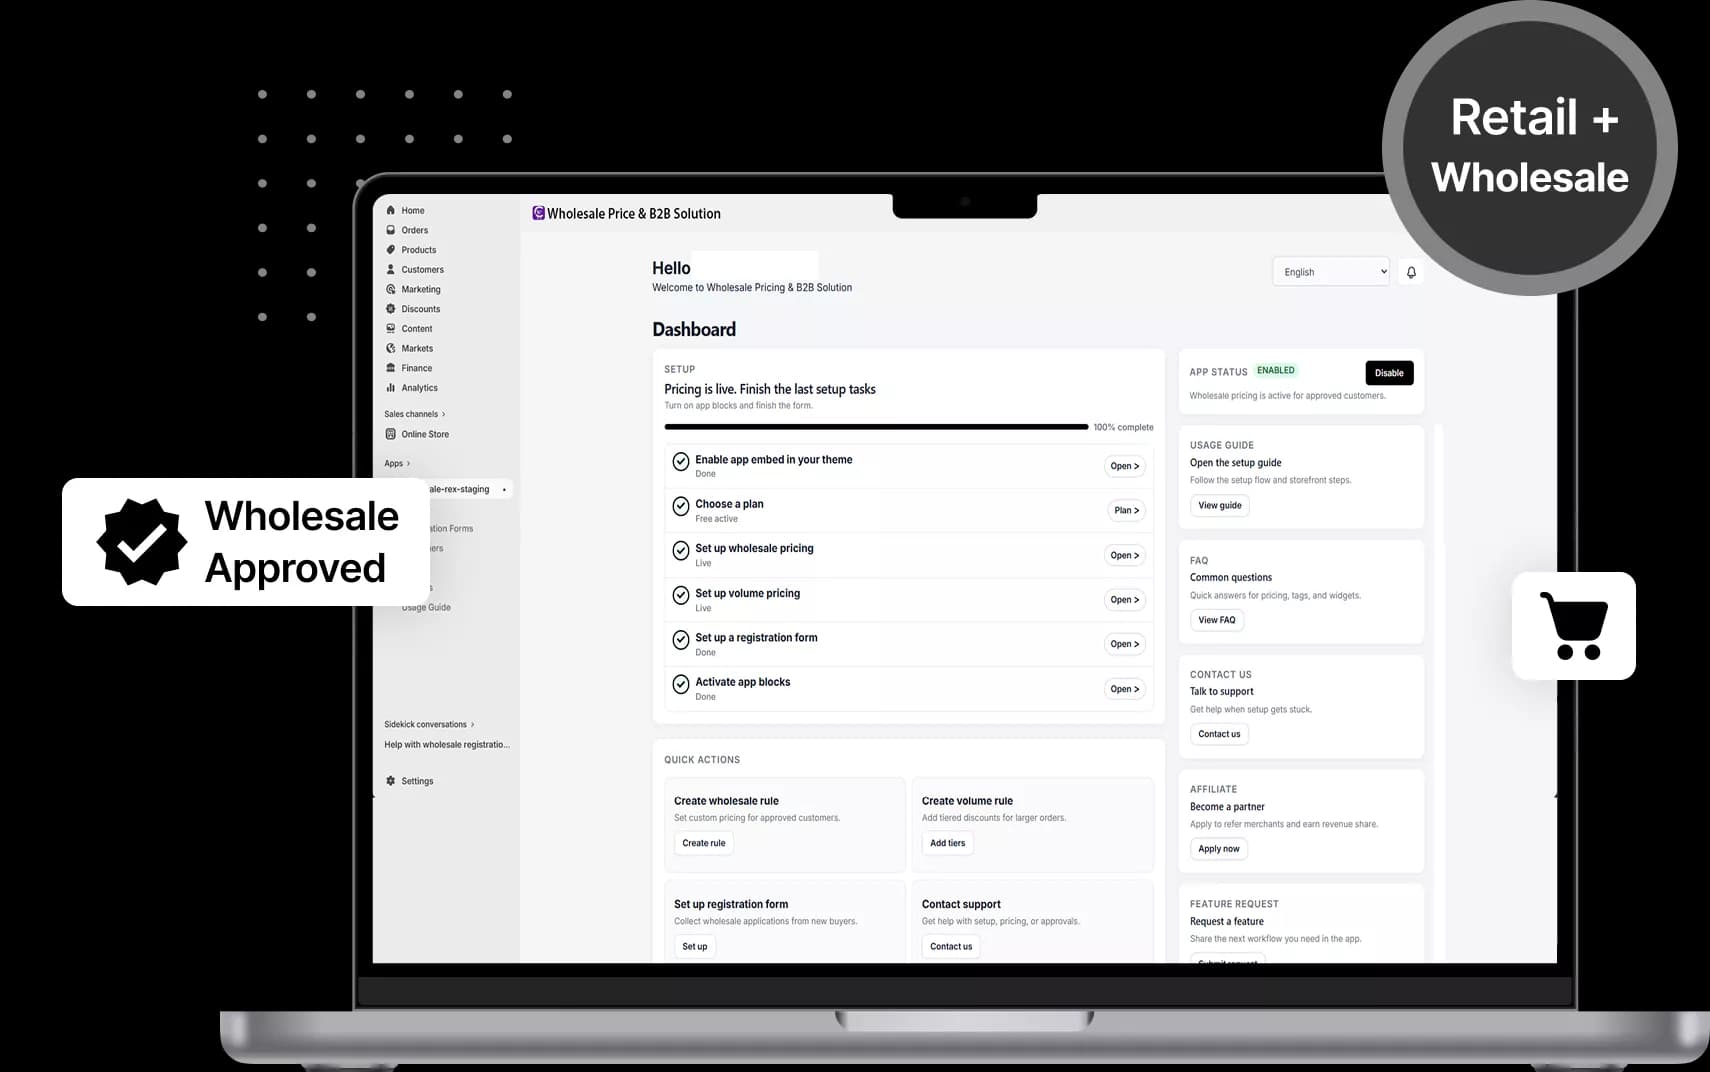
Follow the Setup Checklist on the Dashboard to configure the app step by step, including:
- Theme Integration
- Wholesale Pricing
- Volume Pricing
- Registration Form
- Pricing Rules
- Other recommended settings
Dashboard setup checklist
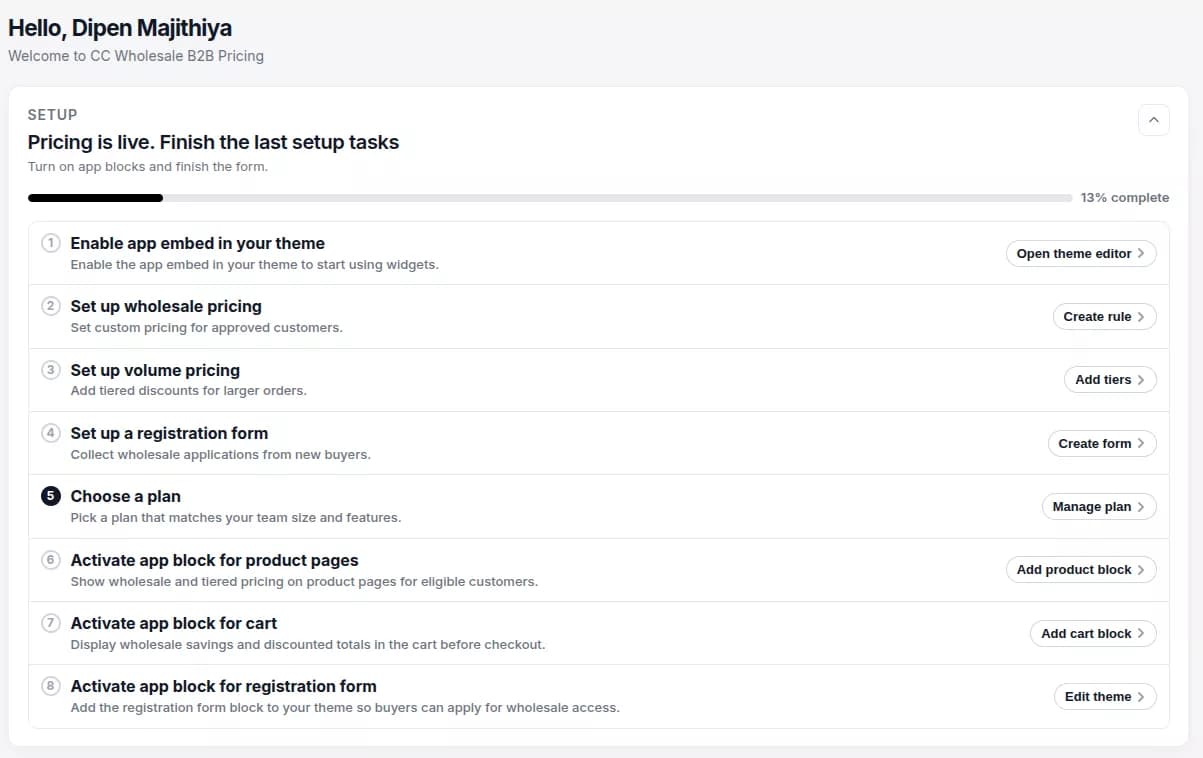
Tip: We recommend completing the Dashboard Setup Checklist in order. It ensures your wholesale store is configured correctly before going live.
2. Enable CC-Wholesale B2B Pricing in Your Shopify Theme
After purchasing a plan and accessing the Dashboard, you must enable the app in your Shopify theme before wholesale pricing and other storefront features become visible.
The following features require the theme extension to be enabled:
- Wholesale Pricing
- Volume Pricing Discount Table
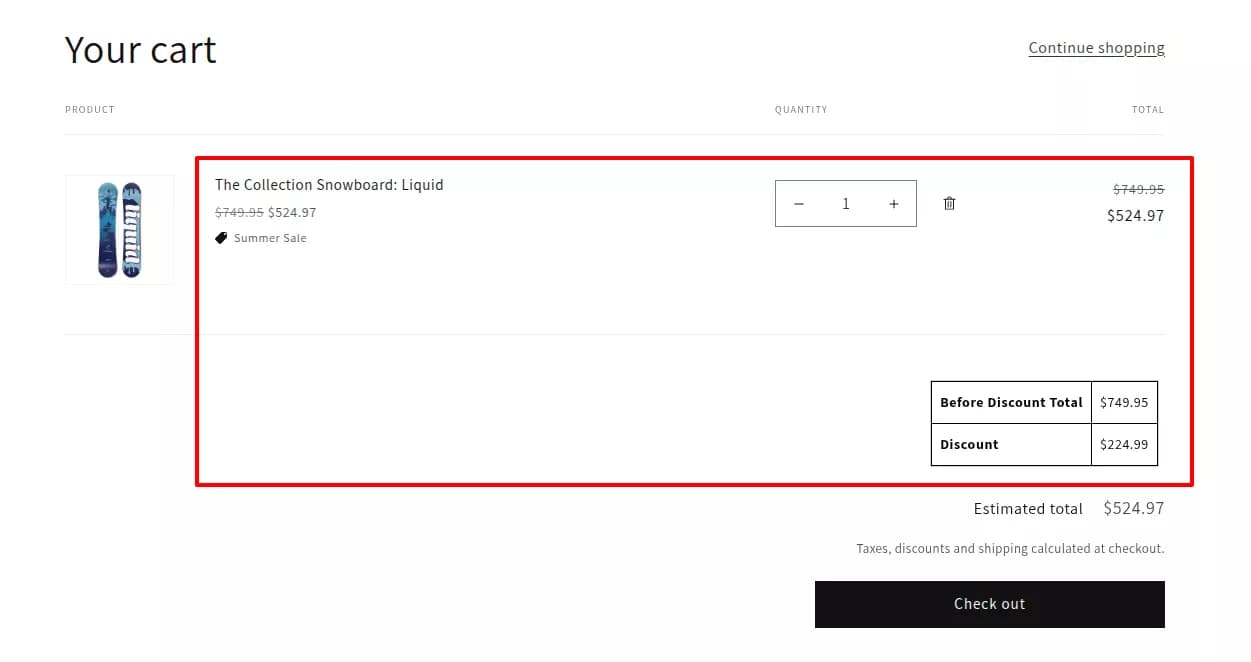
- Cart Discount Table
- Wholesale Registration Form
Enable the App Embed (Required)
The App Embed is required for pricing, discounts, and other storefront functionality.
- Log in to your Shopify Admin.
- Go to Online Store -> Themes.
- Find your active theme and click Customize.
- In the Theme Editor, click the App Embeds icon.
- Locate CC-Wholesale B2B Pricing.
- Toggle the app ON.
- Click Save.
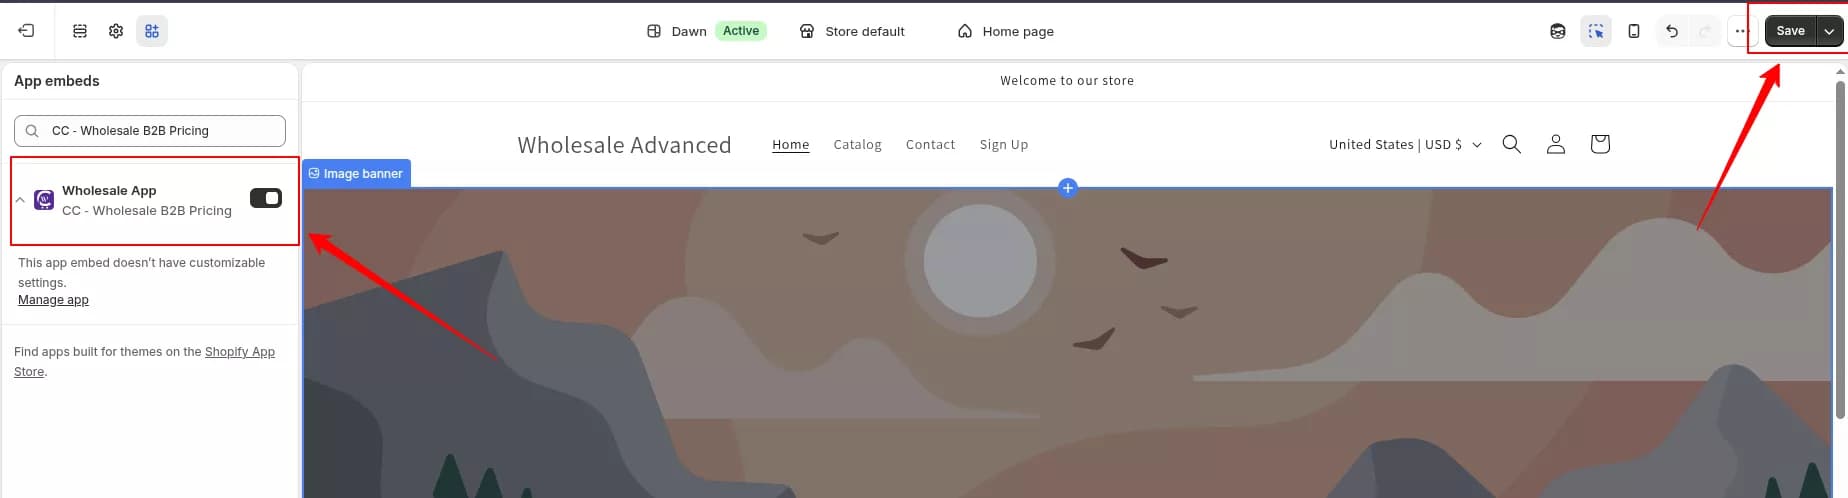
Important: The App Embed must be enabled before using any app blocks.
Add the Volume Pricing App Block (Product Page)
The Volume Pricing App Block displays the quantity/volume discount table on the Product Details page.
- Log in to your Shopify Admin.
- Go to Online Store -> Themes.
- Click Customize on your active theme.
- Open any Product template from the page selector.
- Navigate to the location where you want to display the discount table.
- Click Add Block.
- Under Apps, select CC-Wholesale B2B Pricing - Volume Pricing.
- Position the block as desired.
- Click Save.
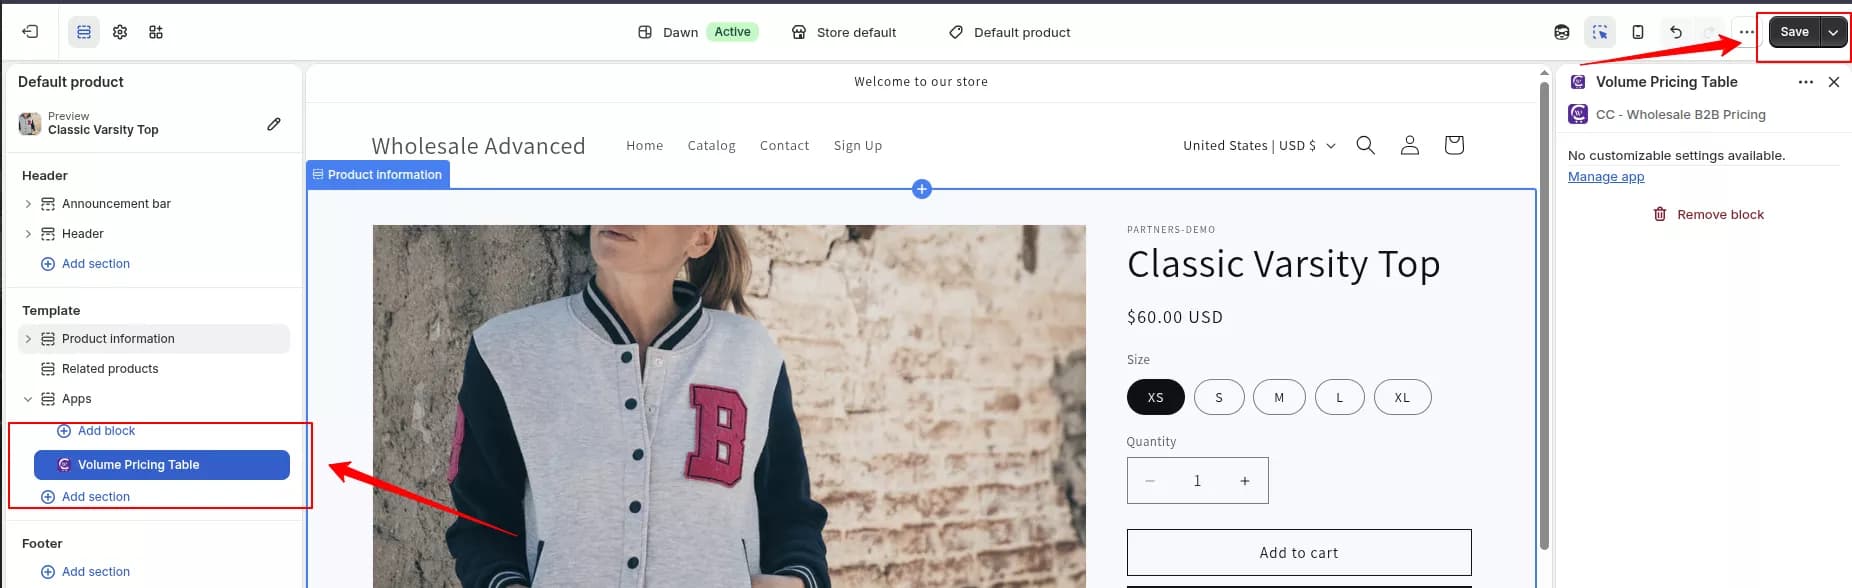
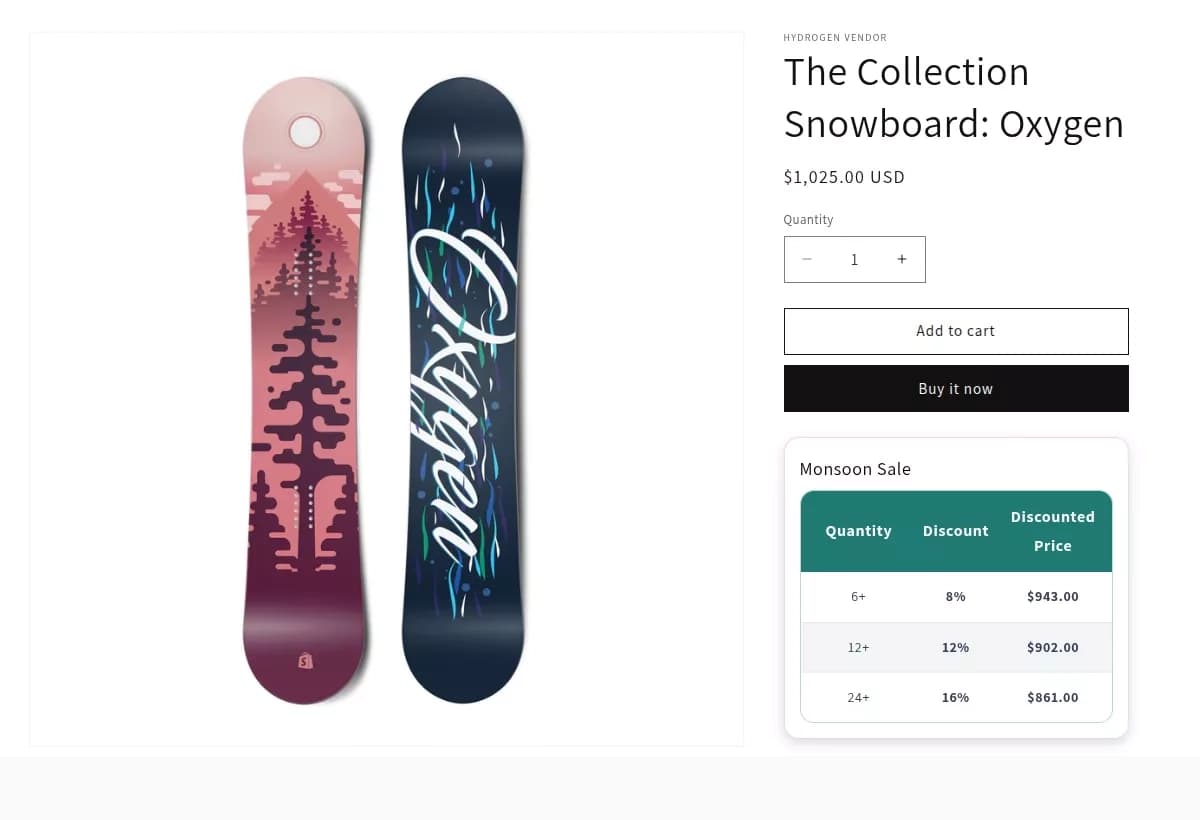
Result: The Volume Pricing Discount Table will appear on the Product Details page according to your pricing rules.
Add the Cart Discount Block (Cart Page)
The Cart Discount Block displays wholesale discounts and savings on the Cart page.
- Log in to your Shopify Admin.
- Go to Online Store -> Themes.
- Click Customize on your active theme.
- Open the Cart template.
- Click Add Block.
- Under Apps, select CC-Wholesale B2B Pricing - Cart Discount.
- Position the block where you want the discount summary to appear.
- Click Save.
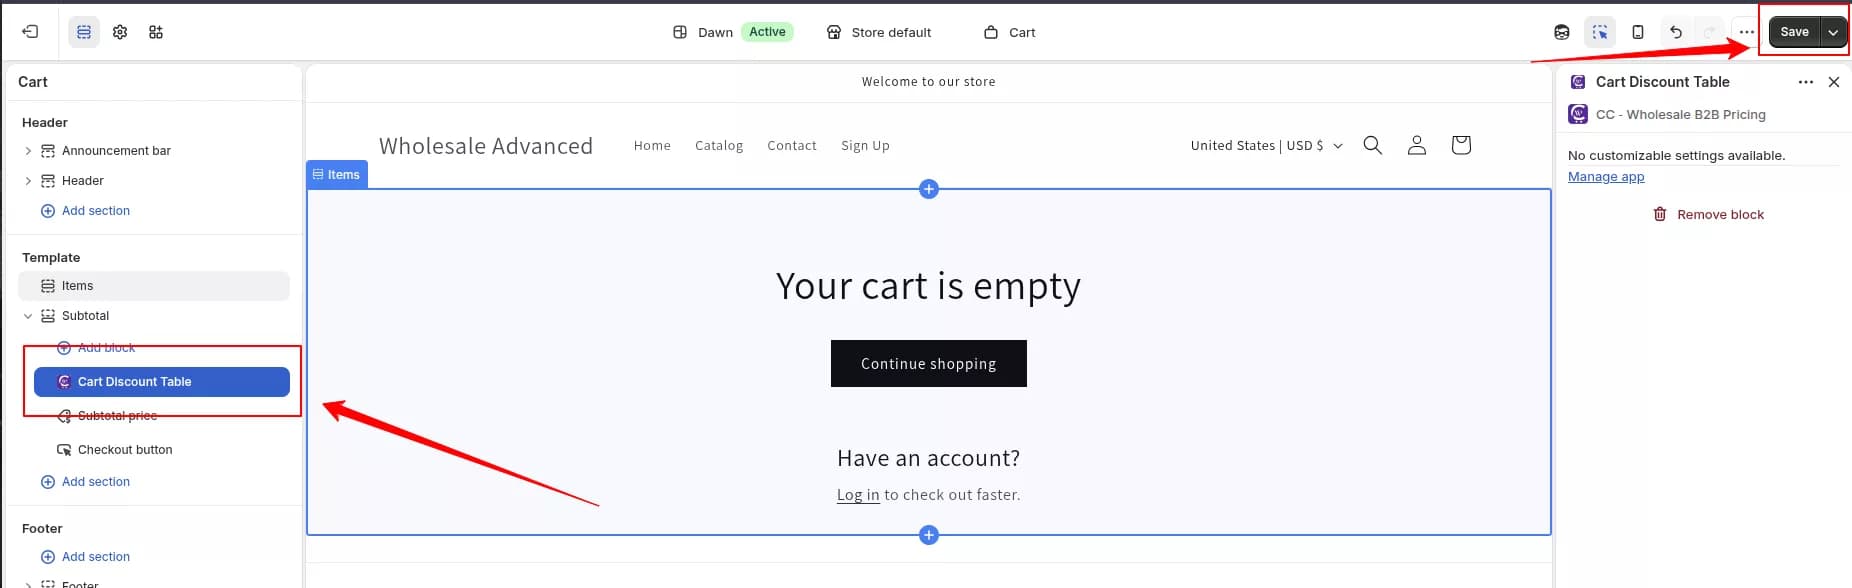
Result: Customers will see wholesale discounts and savings directly on the Cart page.
Add the Registration Form Block
Use the Registration Form block to display the wholesale registration form on a page.
- Log in to your Shopify Admin.
- Go to Online Store -> Themes.
- Click Customize.
- Open the page where you want to display the registration form (or create a new page).
- Click Add Block.
- Under Apps, select CC-Wholesale B2B Pricing - Registration Form.
- Configure the block settings if required.
- Click Save.
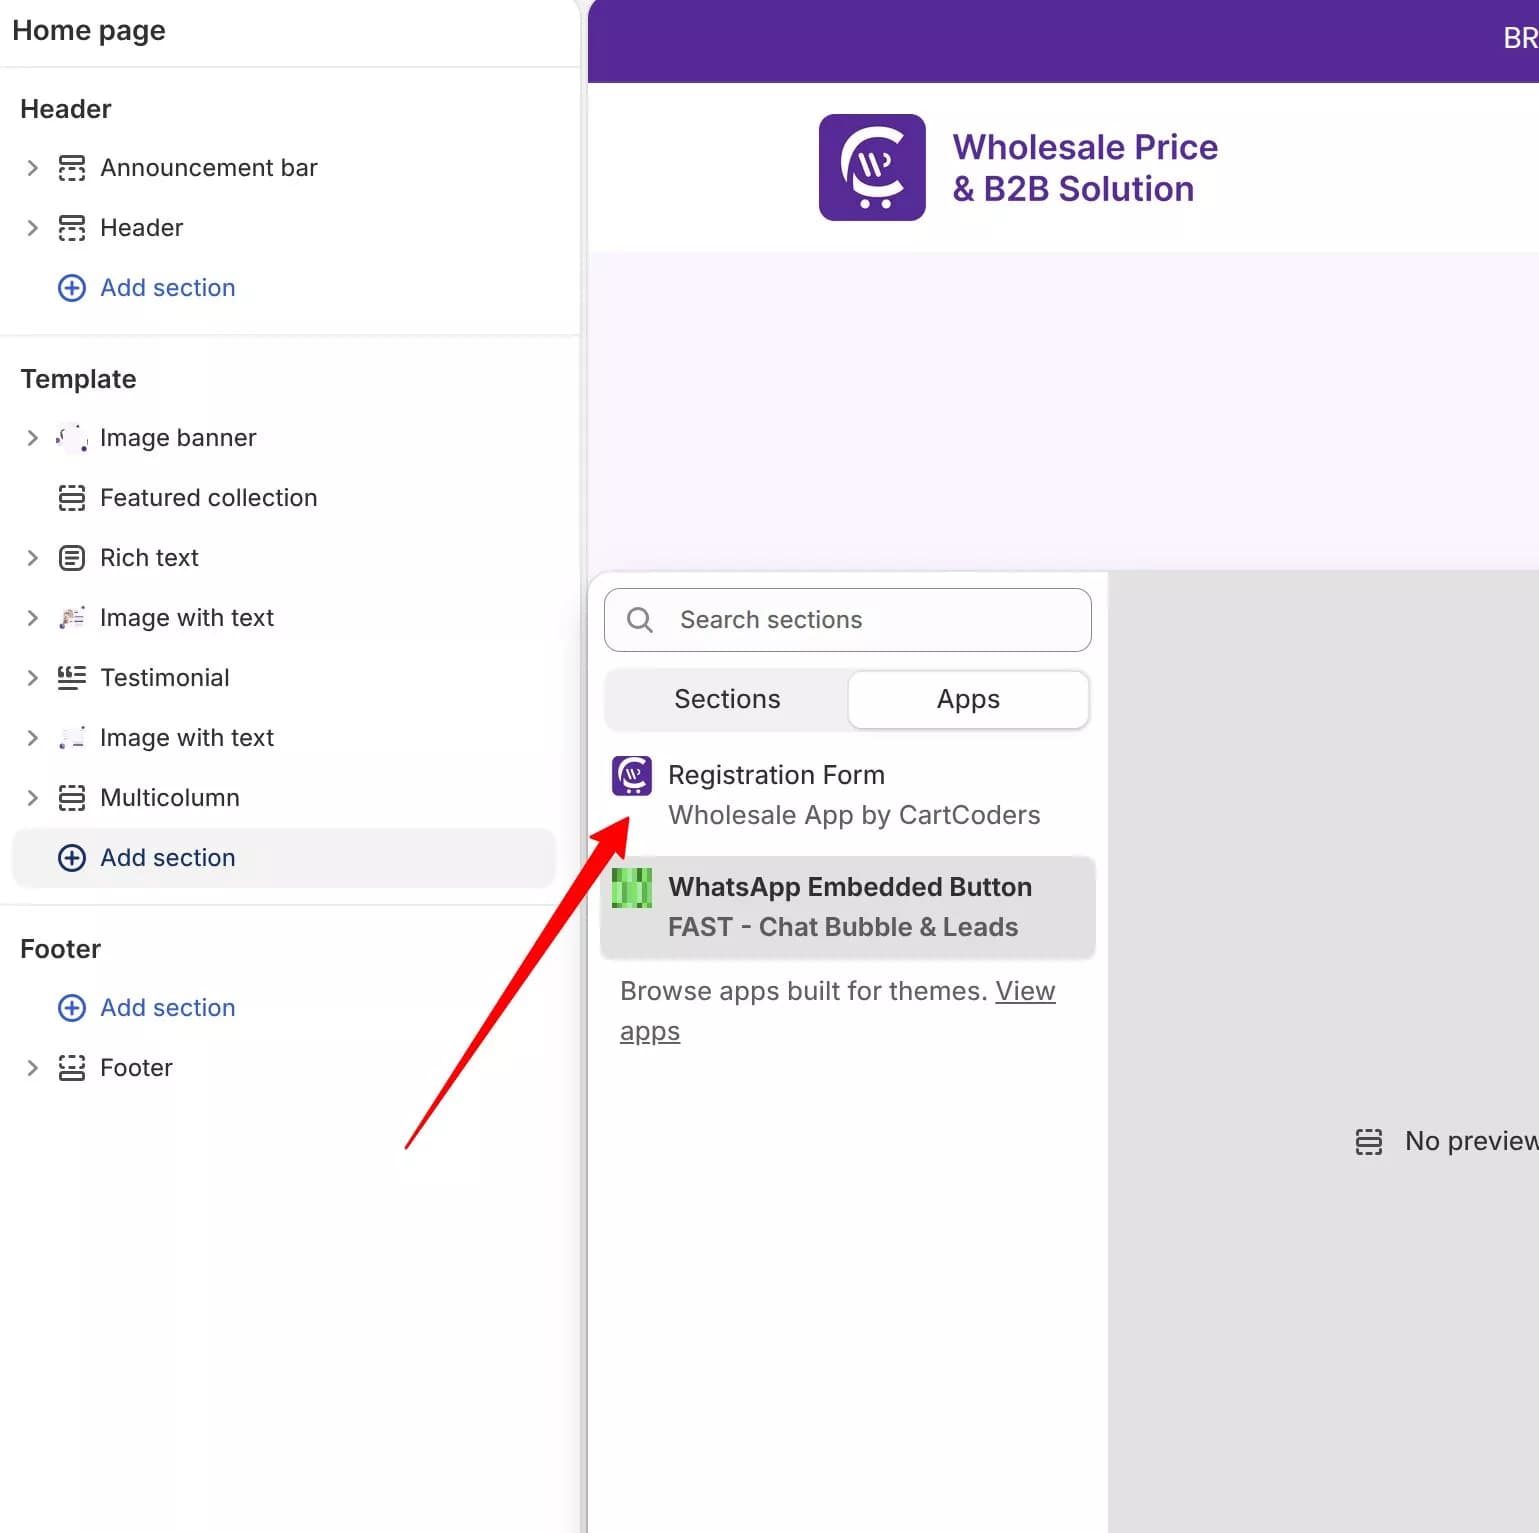
Result: The Wholesale Registration Form will be displayed on the selected page.
Add app blocks (as needed)
Use app blocks when you want to place specific features on selected pages or templates.
| App block | Where to add it | Purpose |
|---|---|---|
| Registration Form | Page template (for example, a wholesale signup page) | Shows your wholesale application form |
| Volume pricing | Product template | Displays quantity or value tier tables on product pages |
| Cart discount | Cart template | Shows wholesale savings summary on the cart page |
Tip: Enable the app embed first. Many pricing features depend on it even when you also add individual app blocks.
3. Overview
CC-Wholesale B2B Pricing is designed to help Shopify merchants run a B2B wholesale program without rebuilding their storefront. The app combines customer-specific pricing, quantity-based discounts, registration and approval workflows, and checkout-ready discount logic in one place.
What the app helps you do
- Create wholesale pricing rules tied to customer tags
- Build volume pricing with quantity or spend tiers
- Publish a registration form to collect wholesale applications
- Review and approve customers, then assign tags that unlock pricing
- Control storefront display, email notifications, and translations from Settings
How access works
Wholesale pricing is tag-based. When you approve a customer and assign a tag (for example, wholesale or distributor), that tag determines which pricing rules apply to them on the storefront and at checkout.
Volume pricing can be shown to shoppers based on quantity or cart value, and is often used alongside wholesale rules for bulk incentives.
4. Wholesale Pricing
Wholesale pricing gives approved customers a custom price based on their customer tag. Use it when only certain B2B buyers should see a special price that regular retail shoppers do not receive.
When to use wholesale pricing
- You sell to distributors, stockists, or VIP buyers with different price lists
- Access depends on who the customer is (their tag), not how much they buy
- You need one discount type per rule: percentage off, amount off, or fixed price
Step-by-step: Create a wholesale pricing rule
- Open the Pricing page
- In CC-Wholesale B2B Pricing, open Pricing from the app navigation.
- Stay on the Wholesale rules tab.
- Click Create wholesale rule.
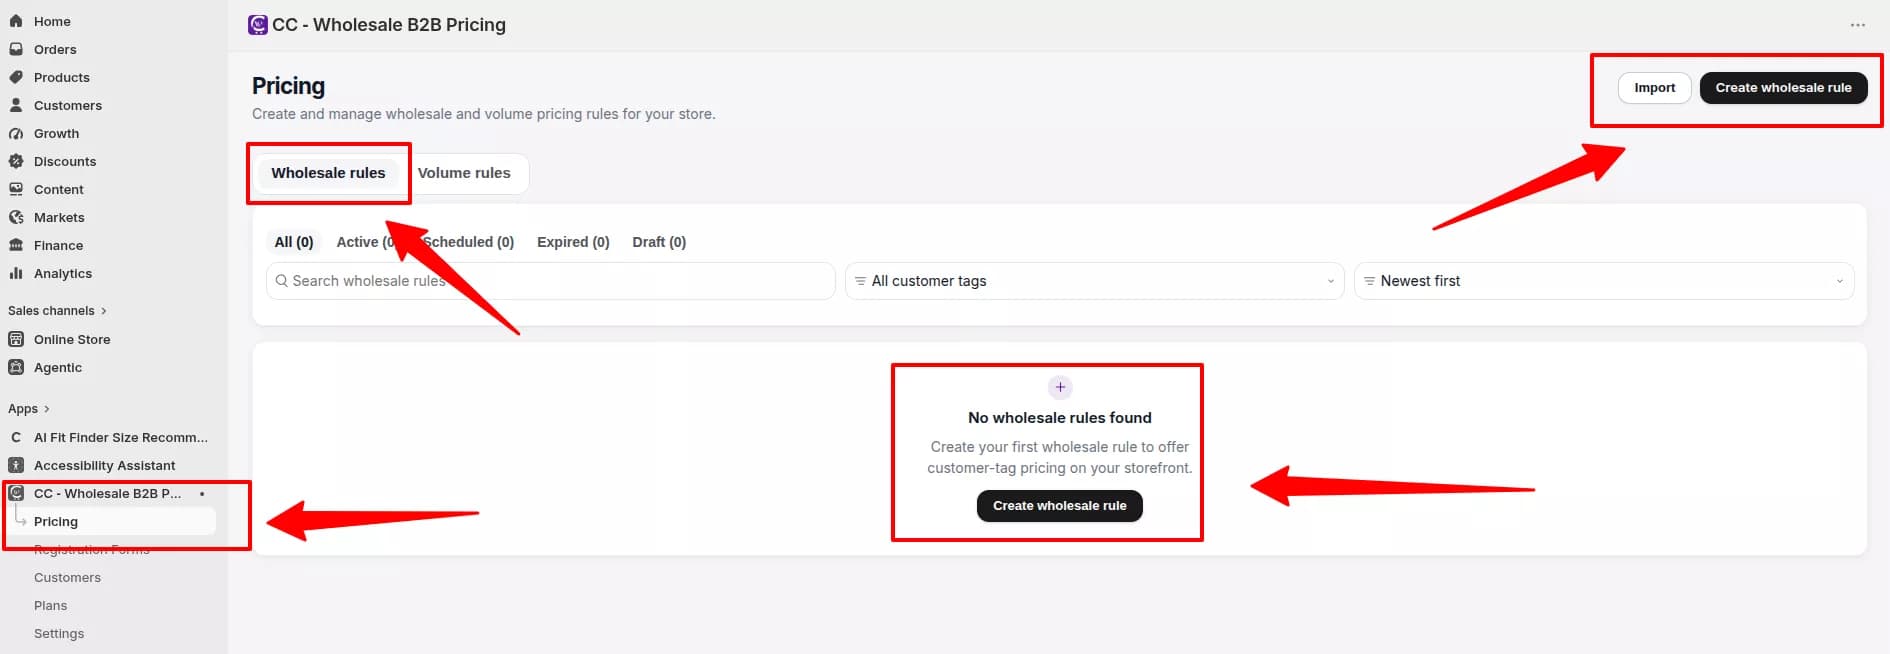
- Customers (who gets this pricing)
- Enter a Rule name (required). This is the admin label for your team.
- Set Status to Active or Draft.
- Choose Customer targeting:
- All Customers, Custom Tag, or a recommended preset tag (for example, VIP Wholesale, Distributors, Stockists)
- Add Customer tags that must match the Shopify customer record.
- Set Customer access: All customers, logged-in only, or Guests only.
- Optionally use Exclude customers to leave specific buyers out of this rule.
- Market (where the rule runs)
- Choose All Markets or Specific Markets (plan-gated).
- If using specific markets, select the market chips that should receive this rule.
- Products (what the pricing applies to)
- Choose Product scope:
- All products
- Selected products
- Specific Collections (plan-gated)
- Optionally use Exclude products to leave specific items out.
- Choose Product scope:
- Pricing logic (discount type and schedule)
- Choose a Discount type:
- Percentage off
- Amount off
- Fixed price
- Enter the Discount value.
- Set Schedule:
- Always On, or
- Scheduled with start and end date and time in your store timezone
- Choose a Discount type:
- Order settings
- Review optional checkout settings (availability depends on your plan):
- Tax exempt
- Custom shipping price
- Extra fees
- Configure Order minimums if you require minimum or maximum order totals before the rule applies.
- Review optional checkout settings (availability depends on your plan):
- Save and test
- Click Save Wholesale Rule in the contextual save bar.
- After save, the app syncs pricing to your storefront and checkout.
- Log in as a test customer who has the matching customer tag.
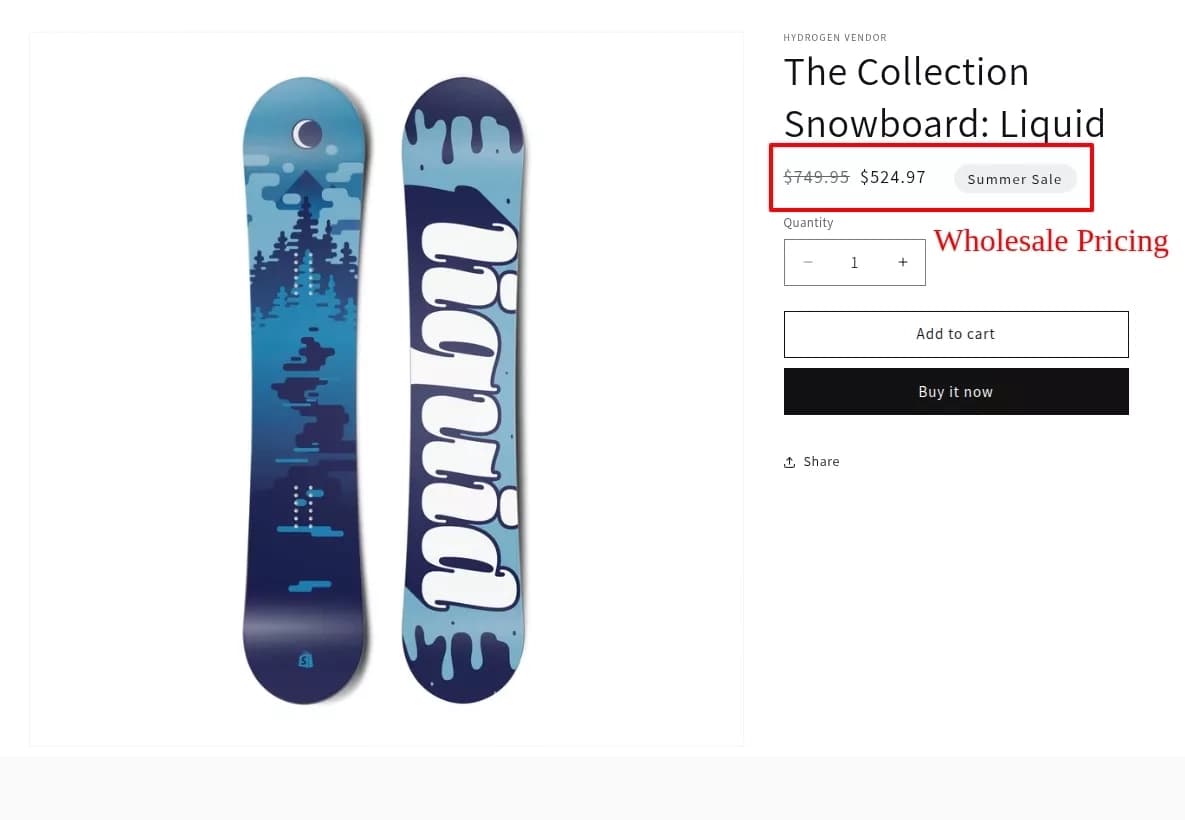
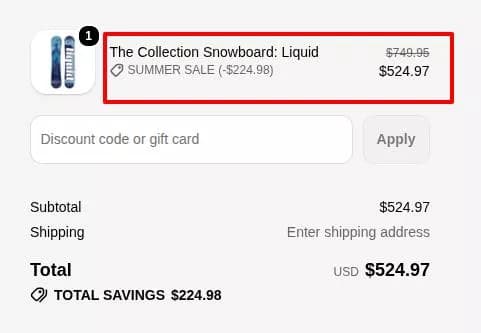
- Confirm the product page and cart show the expected wholesale price.
Product Page Wholesale Pricing Display:
Manage wholesale rules from the list
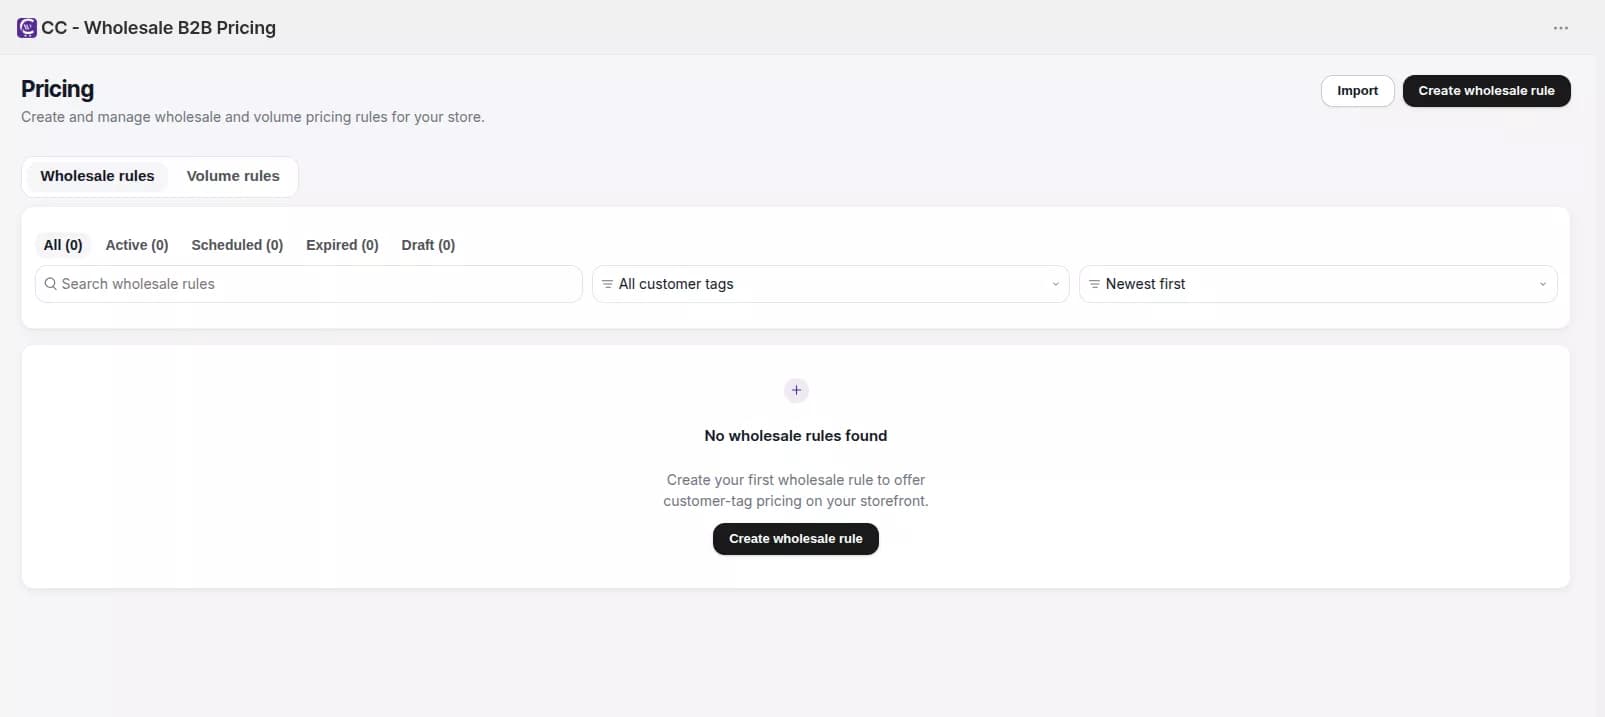
From Pricing > Wholesale rules, you can:
- Filter by status: All, Active, Scheduled, Expired, Draft
- Search and filter by customer tag
- Edit, clone, or delete rules
- Set rules to Active or Draft individually or in bulk
- Import or export rules (CSV or XLSX)
Tip: Wholesale pricing only applies when the customer has the matching customer tag. Tags are assigned when you approve applications in Customers.
5. Volume Pricing
Volume pricing lets customers unlock lower prices when they buy more units or reach a higher order value. Use it for case packs, bulk breaks, and tiered incentives that should be visible before checkout.
When to use volume pricing instead of wholesale pricing
| Wholesale pricing | Volume pricing |
|---|---|
| Access depends on a customer tag | Discount changes by quantity or spend |
| One discount per rule | Multiple tiers per rule |
| Best for tag-gated B2B price lists | Best for quantity breaks and bulk buying |
You can use both rule types in the same store. Configure overlap behavior in Settings > General.
Step-by-step: Create a volume pricing rule
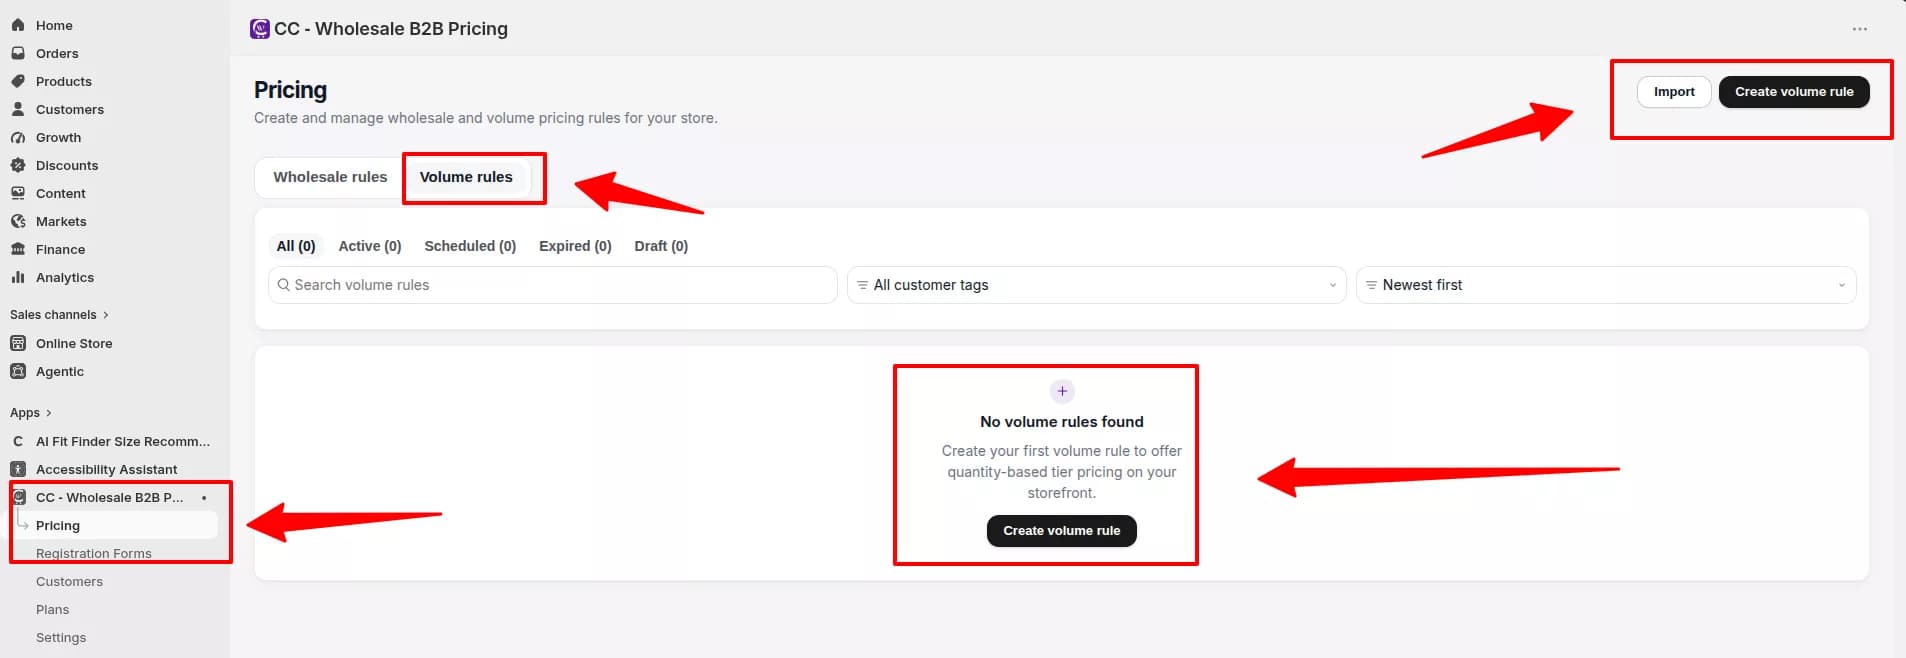
- Open the Pricing page
- In CC-Wholesale B2B Pricing, open Pricing.
- Switch to the Volume rules tab.
- Click Create volume rule.
- Customers, Market, and Products
Follow the same steps as wholesale pricing:
- Customers: rule name, status, customer tags, customer access, exclusions
- Market: all markets or specific markets
- Products: all products, selected products, or collections; exclude products if needed
- Pricing logic (tiers and discount function)
- Choose the Volume pricing type (quantity-based or value-based).
- Add tier rows to the tier table. Each tier includes a threshold and a discount (percentage off, amount off, or fixed price).
- Choose the Discount function (how quantities roll up):
- Per line item (same variant)
- Across variants (mix variants)
- Across products (mix products)
- Set Schedule to Always On or Scheduled.
- Order settings
- Configure tax, shipping, and extra fees (where available on your plan).
- Set Order minimums, including minimum or maximum order quantity and minimum order value.
- Design Layout
- Turn on Show pricing table in storefront if you want buyers to see tiers on the product page.
- Choose a Template (for example, Classic Clean, Offer Cards, or Offer Tiles).
- Configure Display options:
- Show discount value
- Show discounted price
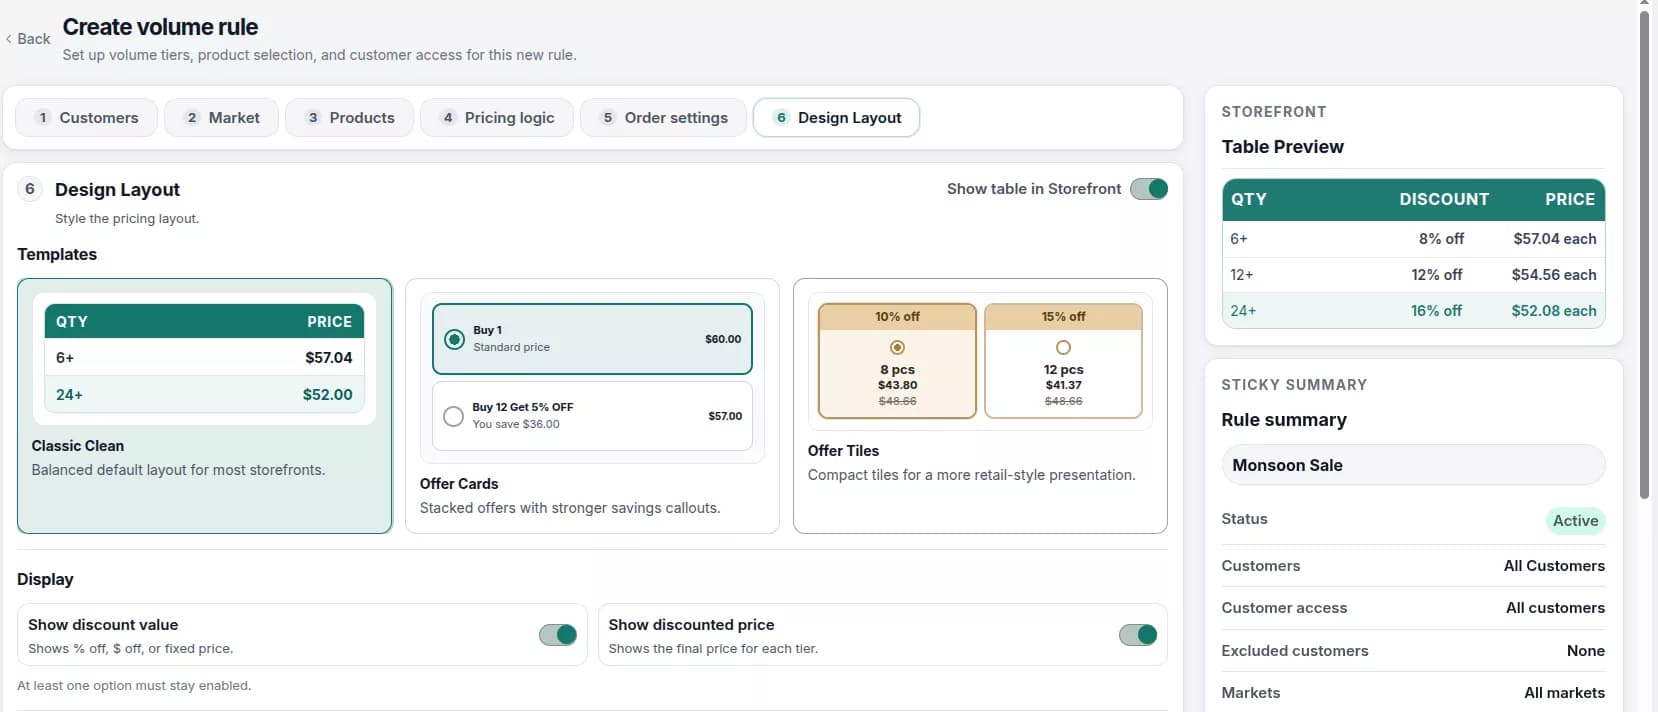
Adjust colors, borders, fonts, and optional custom CSS.
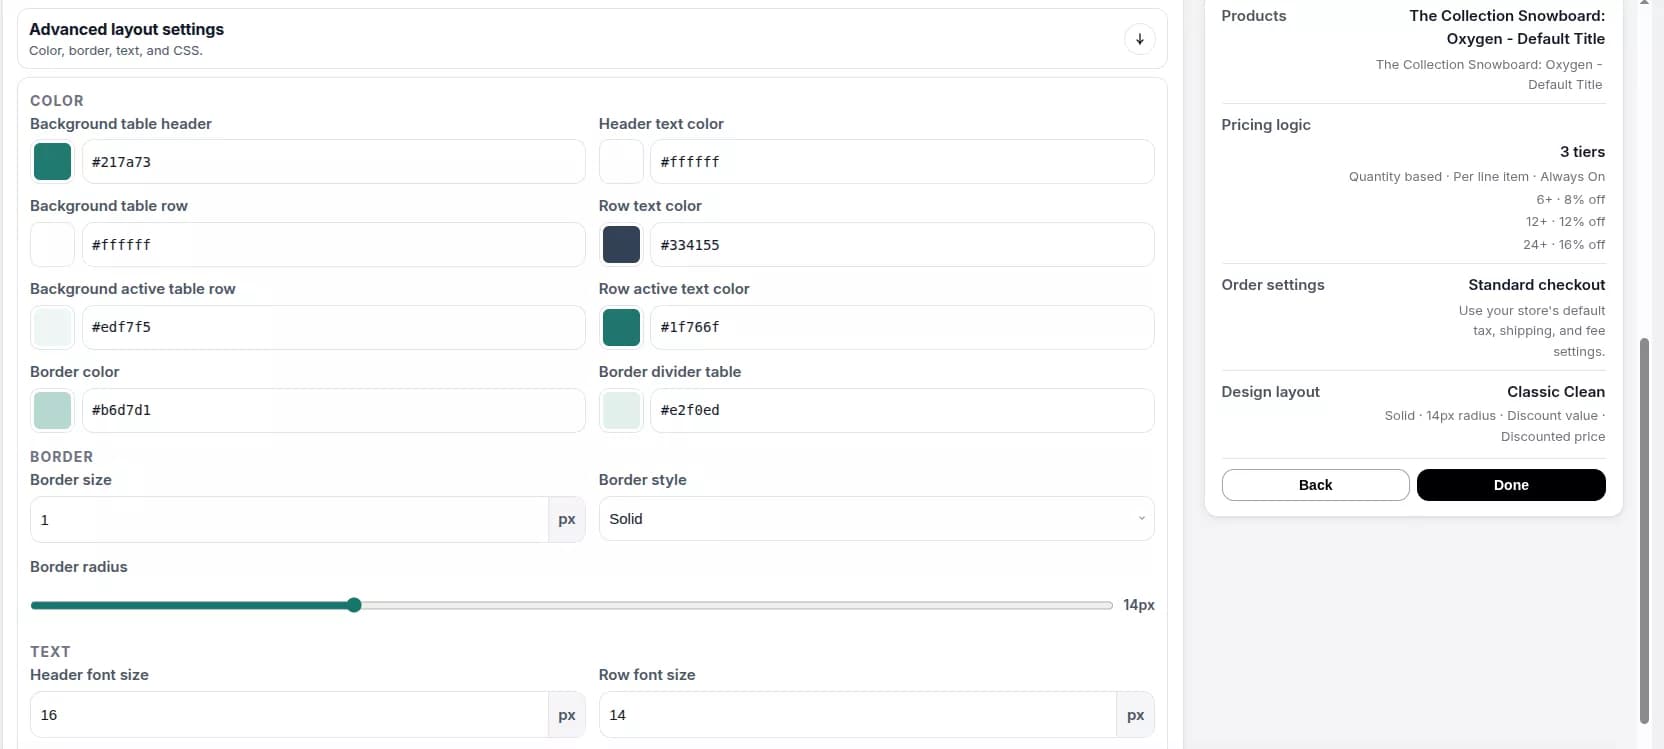
- Review the live preview in the sidebar before saving.
- Save and confirm on the storefront
- Click Save Volume Rule.
- Open a product covered by the rule on your storefront.
- Confirm the pricing table or offer layout reads clearly and matches your brand.
Product Details Page Volume Pricing Discount Table:
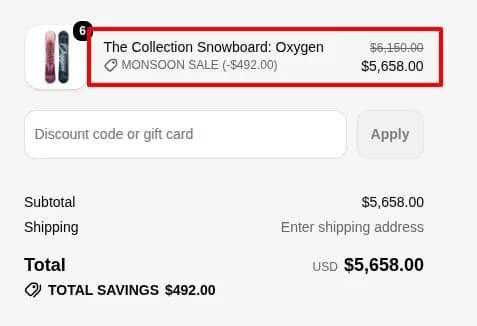
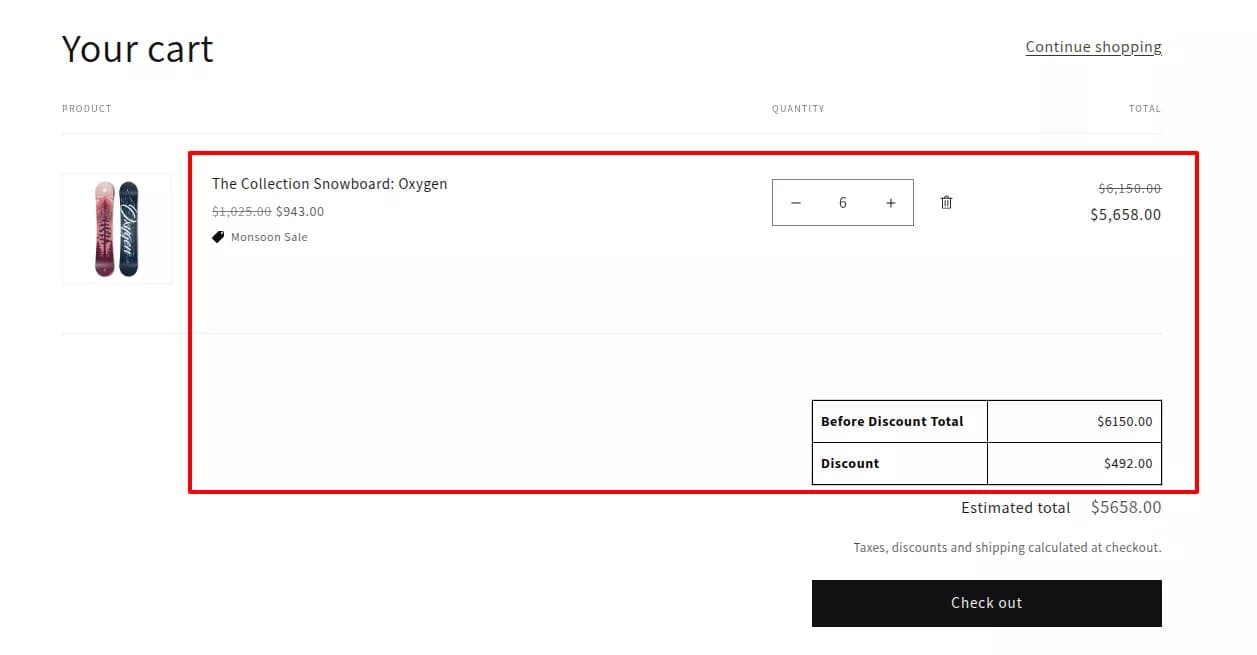
Manage volume rules from the list
From Pricing > Volume rules, you can search, filter, duplicate, import, export, and bulk-update rule status the same way as wholesale rules.
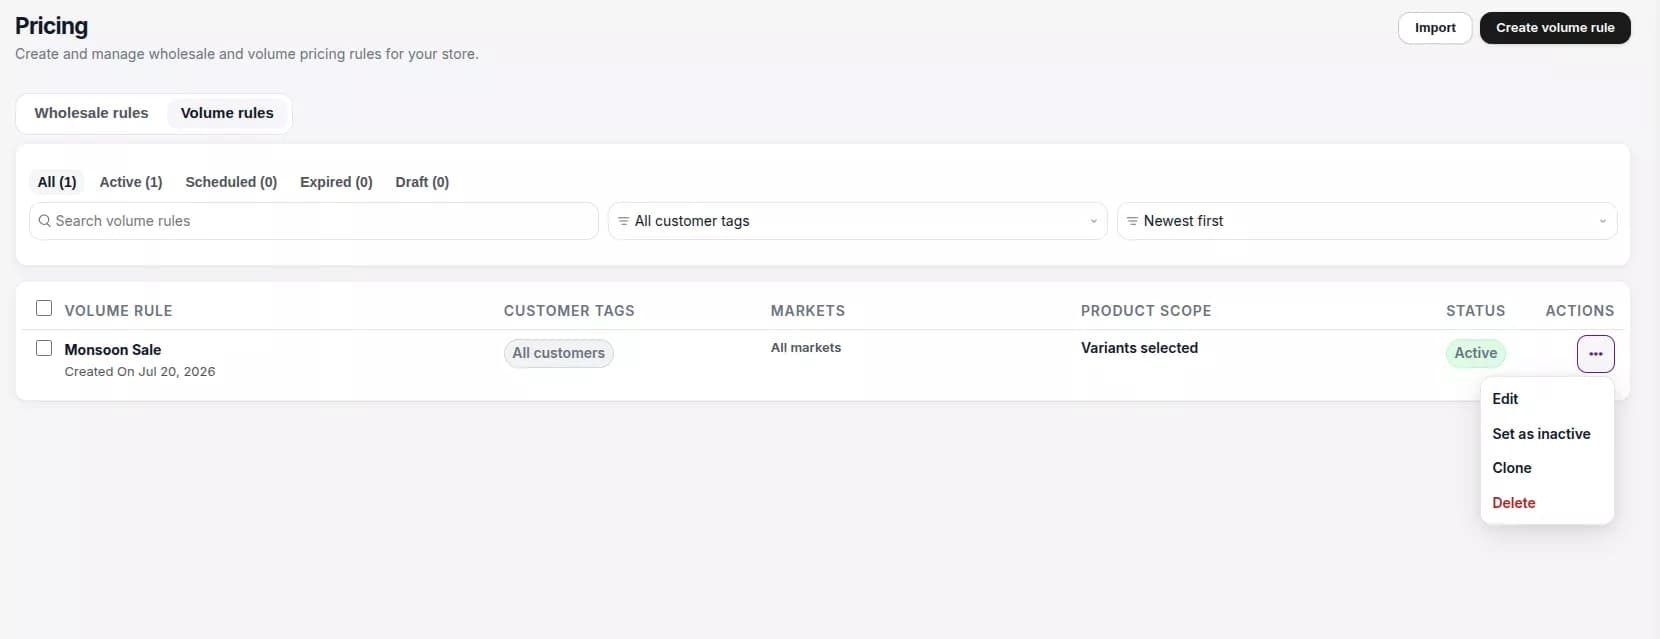
Tip: Use volume pricing when buyers need to see tier breaks before adding to cart, such as "Buy 10+ and save 15%."
6. Registration Forms
Registration Forms let wholesale buyers apply for access before they can see B2B pricing. Submitted applications appear under Customers > Pending approvals.
What you can configure
- Multiple registration forms (limits depend on your plan)
- Business fields such as company name, email, phone, and file uploads
- Custom fields on Growth plans and above
- Manual review or auto-approve workflow
- Customer tags assigned on approval
- Form layout, colors, and storefront messaging
Step-by-step: Create and publish a registration form
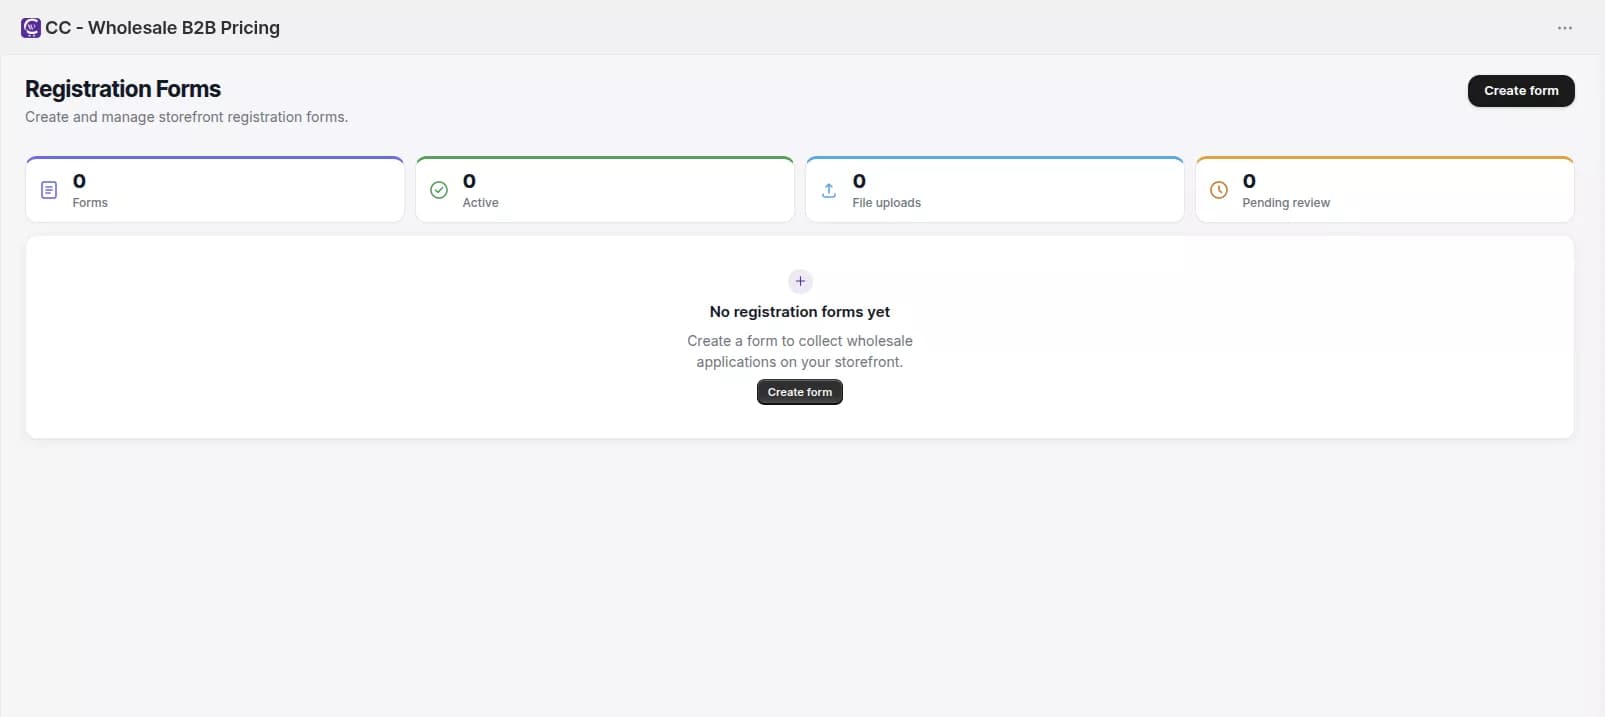
- Create a form
- Open Registration Forms from the app navigation.
- Click Create form.
- Review list metrics: total forms, active forms, file uploads, and pending review count.
- Form details
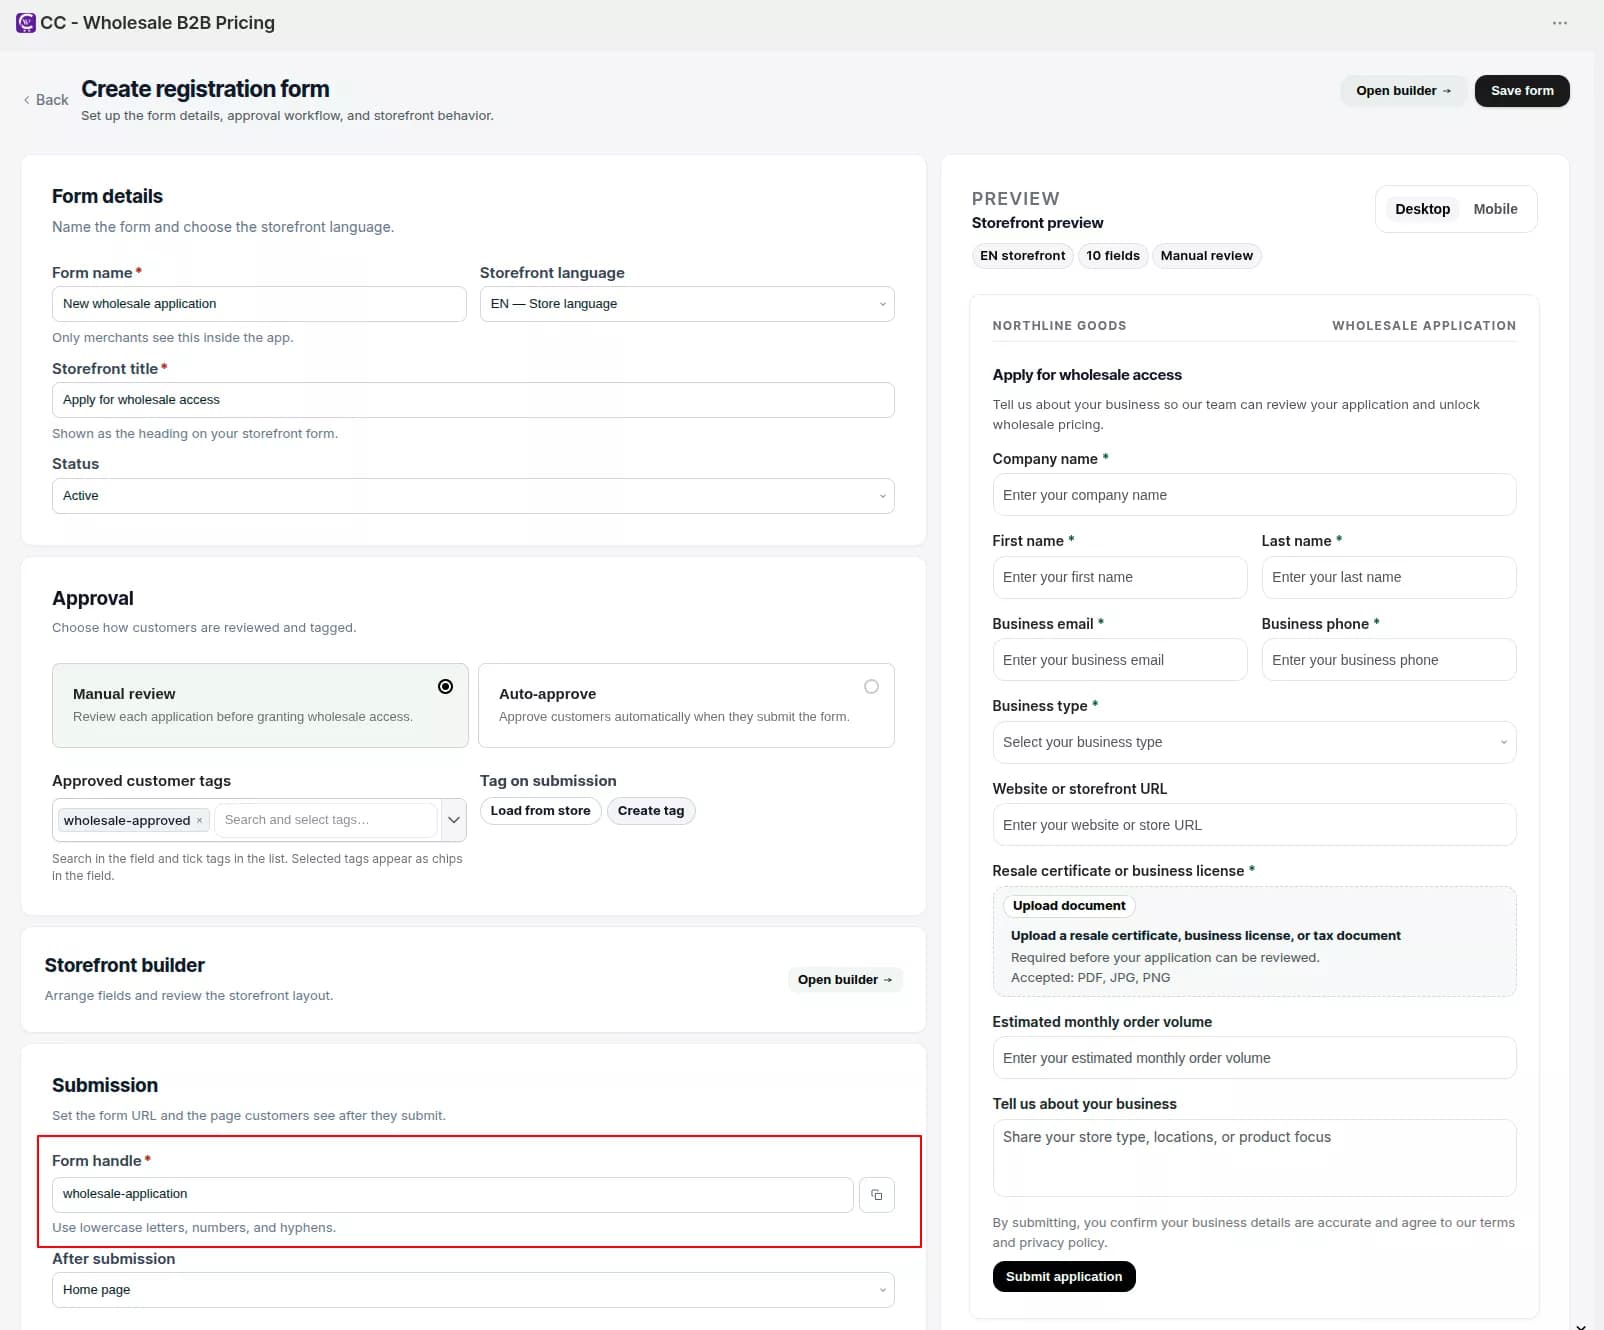
- Enter an Internal name (visible only inside the app).
- Enter a Storefront title (shown as the heading on the live form).
- Set Status to Active or Inactive.
- Set the Form handle (URL slug using lowercase letters, numbers, and hyphens).
- Choose After submission behavior (for example, redirect to storefront home or none).
- Approval settings
- Choose the Customer approval process:
- Manual review: applications stay pending until you accept them
- Auto-approve: customers are approved immediately on submit
- Add Approved customer tags. These Shopify tags are assigned when an application is approved.
- Optionally enable Auto-exempt tax for registrants through this form.
- Customize Success message, Error message, and Approval pending message.
- Choose the Customer approval process:
- Build the form fields
- Click Open builder.
- On the Fields tab, add and reorder fields:
- Core fields: Company name, First name, Last name, Business email, Business phone
- Custom fields (Growth+): Text, Email, Phone, Dropdown, File upload, Long answer, Checkbox, Number, Date, Radio group
- For each field, set label, placeholder, help text, required status, and width.
- Style the form
- Open the Styles tab in the builder.
- Adjust form width, label position, input border radius, button style, spacing, and text alignment.
- Preview on desktop and mobile before saving.
- Save and activate
- Click Save form.
- Return to the Registration Forms list and set the form to Active.
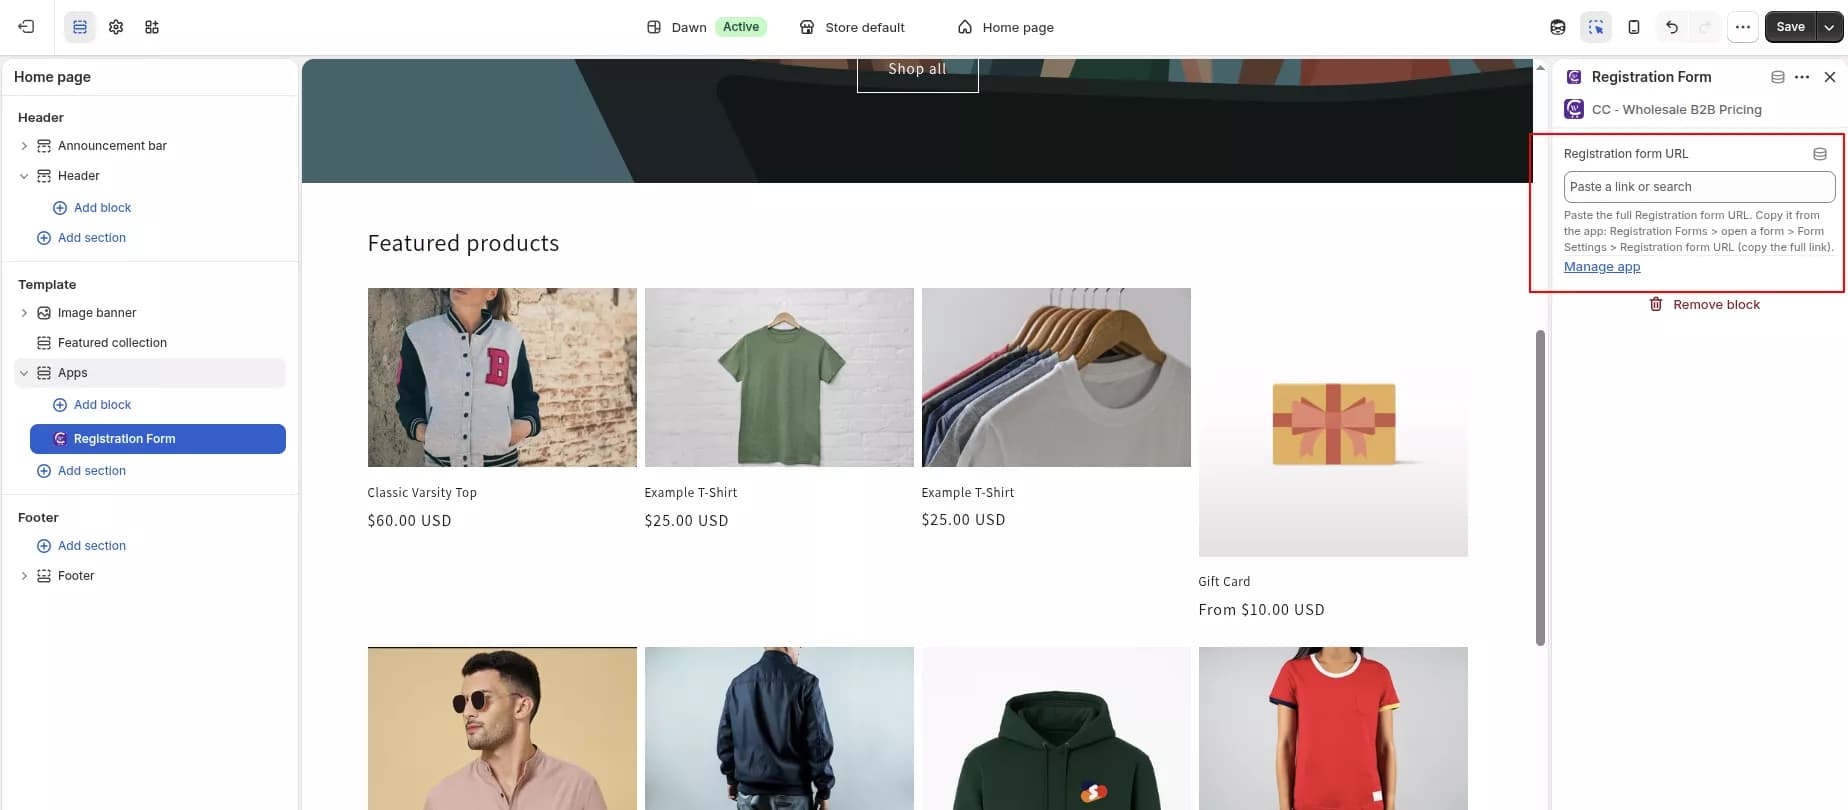
- Click Copy full URL (or copy the form handle URL) for theme setup.
- Add the form to your storefront
- In Shopify admin, go to Online Store > Themes > Customize.
- Open the page where customers should register (for example, a wholesale or apply page).
- Add the Registration Form app block from CC-Wholesale B2B Pricing.
- In the block settings, paste the copied Registration form URL.
- Click Save.
- Optional spam protection
Before publishing, open Settings > General and configure Google reCaptcha to protect the form from spam submissions.
Tip: Ask only for details your team truly needs. Shorter forms convert better and are easier to review.
7. Customers
The Customers area is where you review wholesale applications and manage approved buyer access. It is separate from the main Shopify Customers admin, but approved records sync back to Shopify with the tags you assign.
Two tabs
| Tab | Purpose |
|---|---|
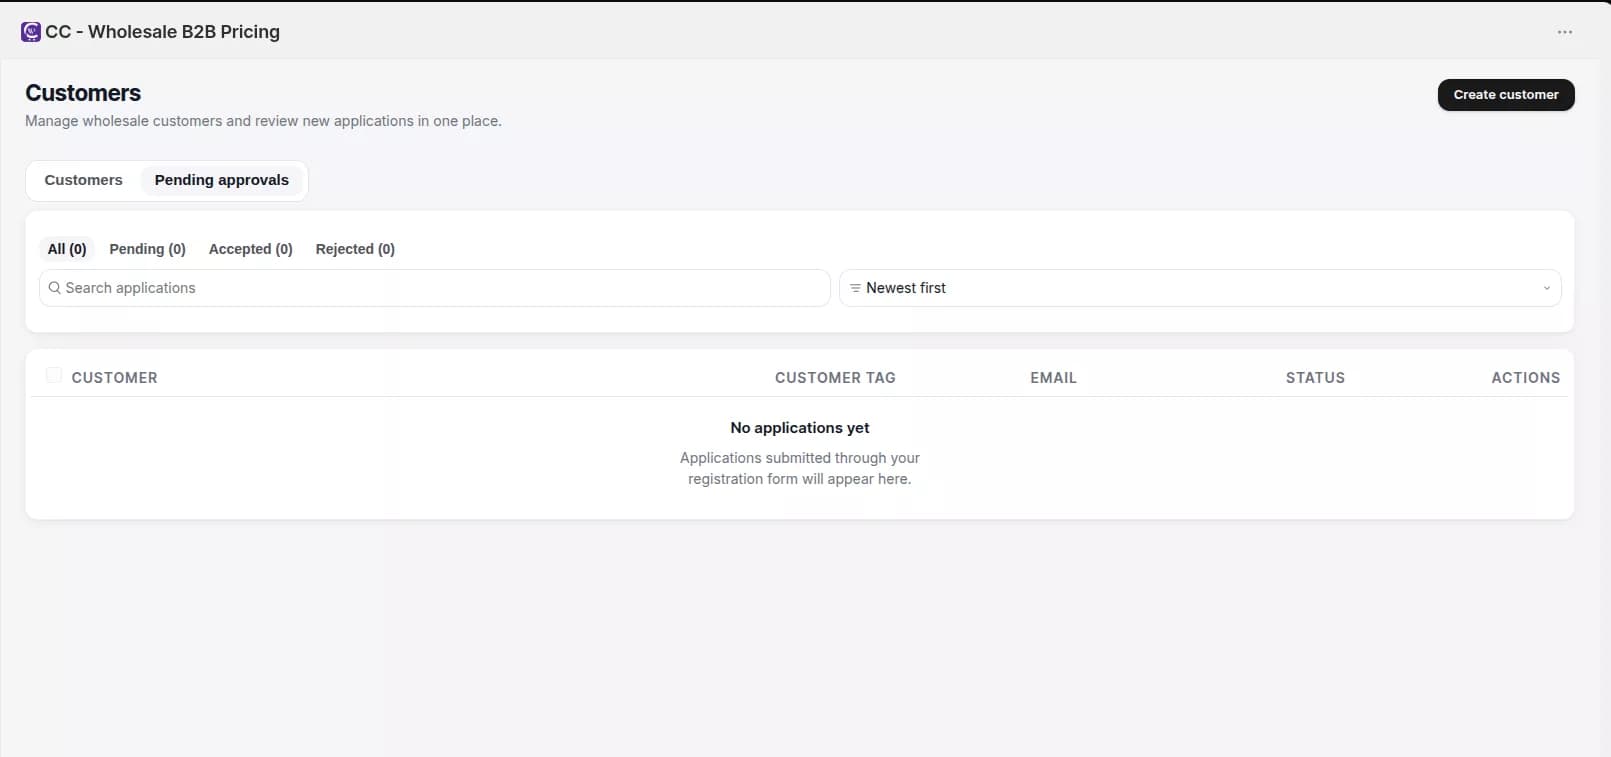
| Pending approvals | Review new registration submissions |
| Customers | Manage approved wholesale customer records |
Step-by-step: Review pending applications
- Open Customers from the app navigation.
- Switch to Pending approvals.
- Use search and status filters (Pending, Accepted, Rejected) to find applications.
- For a single application:
- Click Accept, assign a Customer tag, and confirm. The tag unlocks matching wholesale pricing rules.
- Click Reject, enter a Rejection reason, and confirm. A reason is required.
- For multiple applications, select rows and use Bulk Accept or Bulk Reject.
What happens after approval
- The application status changes to approved.
- The customer record syncs to Shopify with the assigned tag(s).
- Matching wholesale pricing rules begin to apply on the storefront and at checkout.
- If enabled in Settings, the customer receives an approval email.
Step-by-step: Manage approved customers
- Open the Customers tab.
- Search, filter by customer tag, and sort the list.
- Use row actions to:
- Activate or Deactivate wholesale access
- Open Customer details to review registration data and uploaded documents
- View in Shopify to open the Shopify Admin customer record
- Use Create customer to add a wholesale customer manually by choosing a registration form and filling in its fields.
Customer detail page
On the customer detail page you can review:
- Registration and business information
- Uploaded documents (secure merchant download)
- Wholesale access status (active or deactivated)
- Application notes and supporting details
Tip: Choose customer tags carefully. The tag you assign during approval determines which wholesale pricing rules that customer receives.
8. Settings
Open Settings from the app navigation to control pricing behavior, email notifications, and storefront translations. Changes on the General and Notifications tabs save automatically.
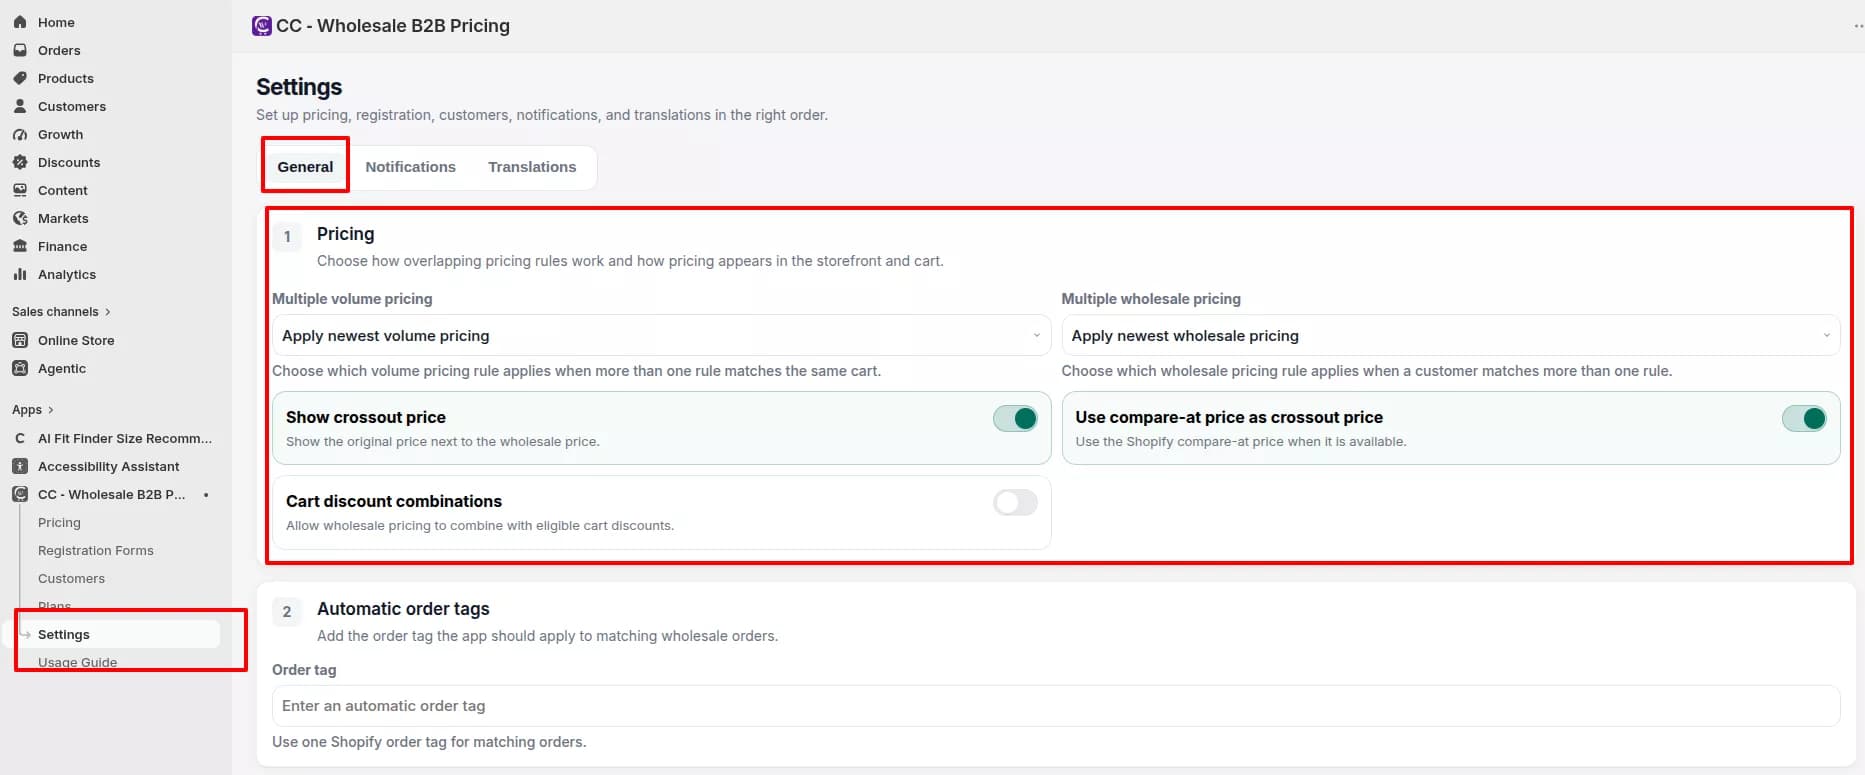
Settings has three tabs: General, Notifications, and Translations.
8.1 General settings
Use the General tab to define how pricing logic and security settings behave across your store.
Pricing
- Open Settings and stay on General.
- Configure Multiple volume pricing:
- Apply newest volume pricing
- Apply oldest volume pricing
- Auto-apply volume pricing takes priority
- Configure Multiple wholesale pricing with the same three options for overlapping wholesale rules.
- Toggle storefront pricing display:
- Show crossout price: show the original price next to the wholesale price
- Use compare-at price as crossout price: use Shopify compare-at when available
- Cart discount combinations: allow wholesale pricing to combine with eligible cart discounts
Automatic order tags
- Enter an Order tag the app should apply to matching wholesale orders.
- Use one Shopify order tag for reporting and fulfillment workflows.
Google reCaptcha
- Choose reCaptcha type (v2 or v3).
- Select the Language shown in the widget.
- Enter your Site key and Secret key from Google.
- Save is automatic. Confirm values before leaving the page.
Configure reCaptcha before publishing your registration form if you want to reduce spam submissions.
CSV order upload (where available on your plan)
- Enable CSV order upload.
- Set required customer tags, max rows, SKU and quantity column headers, and catalog allowlist (collections).
Product visibility rules (where available on your plan)
- Enable visibility rules.
- Create named rules with visibility modes such as Require customer tags, B2B only, or Retail only.
- Target products or collections and apply rules to theme, cart, and checkout enforcement.
8.2 Notifications settings
Use Notifications to control who receives emails, what each message says, and which provider sends it.
- Open Settings and switch to Notifications.
- Merchant notifications
- Turn on New application email when a customer submits a wholesale application.
- Set the recipient inbox, subject, and body template.
- Click Edit emails for full template editing.
- Customer notifications
- Customize Approved request email and Rejected request email.
- Use Liquid variables in templates:
{{ shop.name }}{{ customer.first_name }}{{ customer.last_name }}{{ customer.email }}{{ customer.company_name }}{{ customer_tag }}{{ rejection_note }}
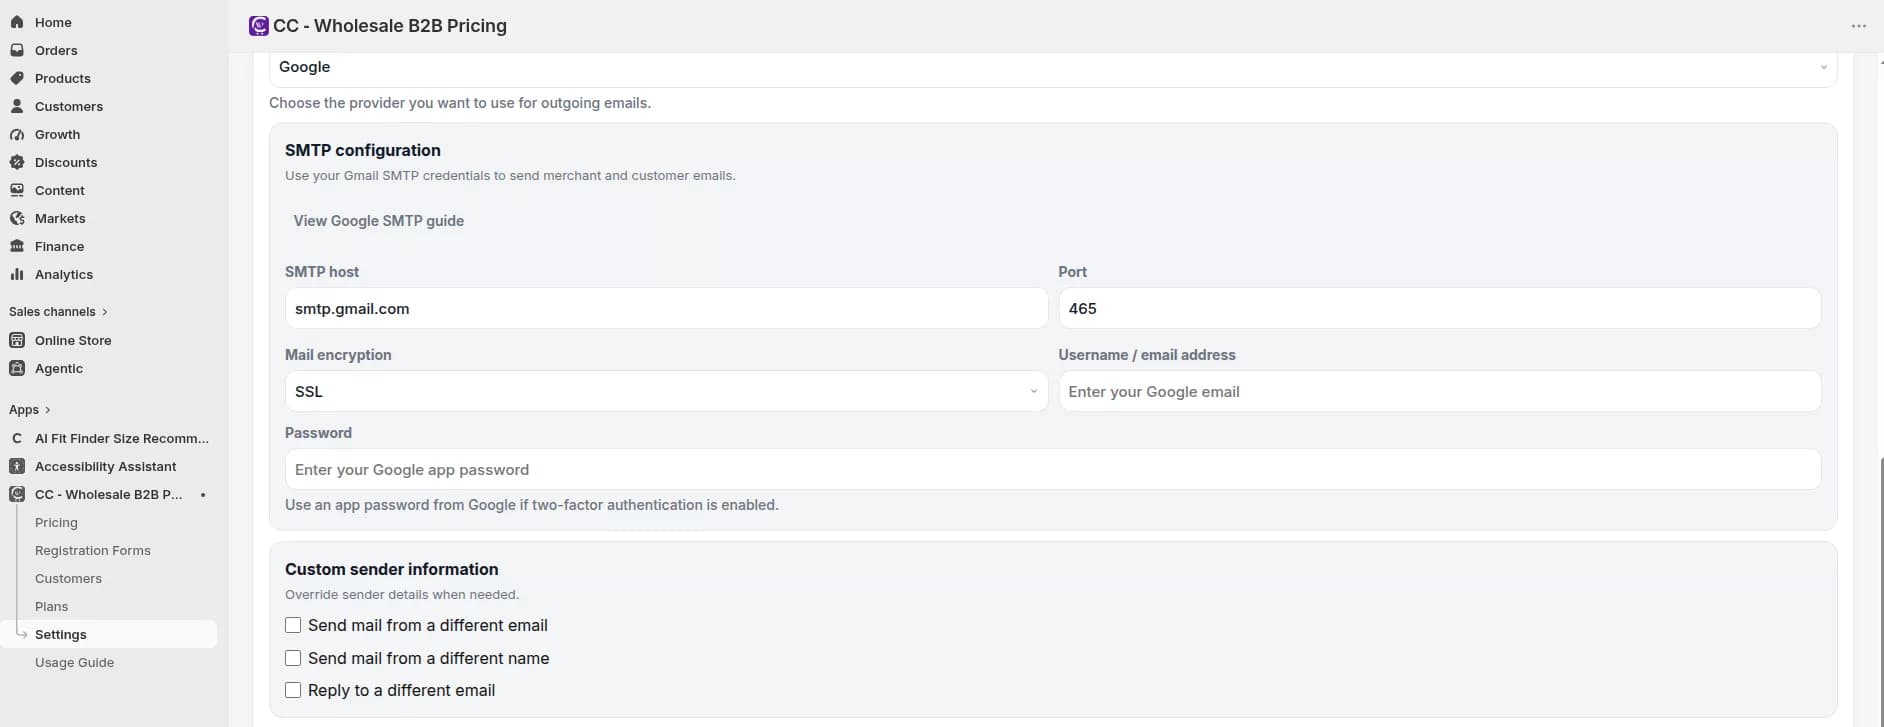
- Email delivery
- Choose the default app mail service or turn on Use your own mail provider.
- Connect Google, Mailgun, or SendGrid if using custom delivery.
- Send a test email (up to 10 test emails per day) before launch.
Tip: Test approval and rejection emails before go-live so customers receive clear, branded communication after review.
8.3 Translations settings
Use Translations to manage customer-facing copy for pricing widgets, registration forms, validation messages, and status text.
- Open Settings and switch to Translations.
- Choose a Shopify language from the dropdown and click Add language.
- Set the Default language used when a buyer locale has no translation yet.
- Click Edit on a language row to translate sections such as:
- Pricing tables and widgets
- Registration form labels and placeholders
- Validation and status messages
- Click Save translations when your changes are ready.
- Delete non-default languages only when you no longer need them.
Tip: Translations affect customer-facing storefront copy. Merchant-facing admin labels stay in the app language.
9. Recommended Launch Sequence
Launch checklist
Follow this order for a smooth rollout from install to live B2B sales:
- Dashboard: Review the setup checklist and confirm your store connection.
- Plans: Confirm you are on the right plan for your rule count, forms, and support needs.
- Pricing: Create wholesale rules by customer tag.
- Pricing: Add volume rules if you need quantity or spend tiers.
- Registration Forms: Create, style, and activate your wholesale application form.
- Theme: Enable the app embed and add the Registration Form block (and other blocks as needed).
- Customers: Review Pending approvals, accept with the correct customer tag, or reject with a clear reason.
- Settings: Finish General pricing overlap, reCaptcha, notifications, and translations.
- Storefront test: Log in as an approved test customer and verify product pricing, volume tables, cart totals, and checkout.
[Recommended B2B launch checklist]
Tip: Test the full buyer journey before announcing wholesale access: register, wait for approval (or use auto-approve in staging), then confirm pricing on product and cart pages.
Need help?
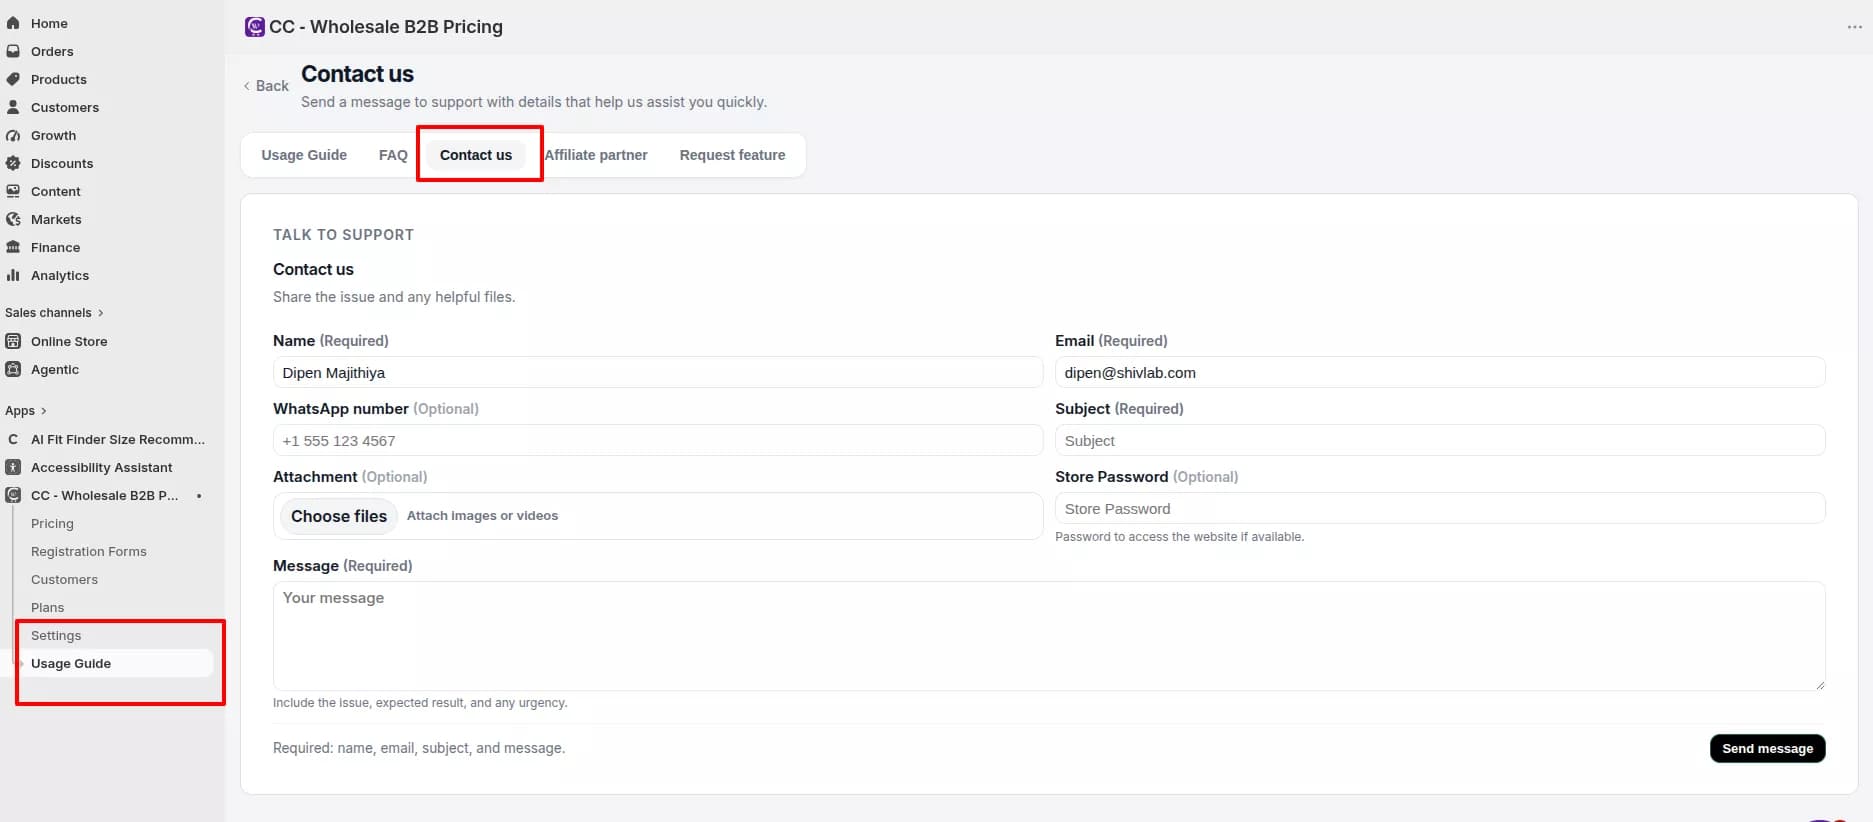
Get Setup, Migration, Billing, or Troubleshooting Support
If you need setup, migration, billing, or troubleshooting support beyond this guide, open Contact us inside the CC-Wholesale B2B Pricing app. Include your store name, a clear description of the issue, and screenshots when possible.