
Many Shopify stores are building Android apps to give customers faster access, better engagement, and direct checkout experiences.
But connecting an app to a Shopify store the wrong way can expose sensitive data and hurt store performance.
A common mistake is using the Admin API directly inside the app — a shortcut that can leak access tokens or disrupt store operations.
Shopify provides different APIs for different needs, and choosing the right one determines whether your integration remains safe or risky.
This blog explains how to connect Shopify with Android the right way — keeping customer data secure, app performance stable, and future updates simple.
Why the Wrong Integration Can Cost You Big?
Connecting a Shopify store to an Android app through the wrong API might seem harmless at first. But one misplaced token or misused endpoint can lead to serious problems.
When an Android app uses the Admin API directly, it carries full access to products, customers, and orders. Anyone who extracts that token from the app can misuse it — changing prices, viewing customer data, or deleting inventory.
Even if no attack happens, direct Admin calls slow down performance. Shopify’s Admin API is built for backend systems, not mobile devices. It can quickly hit rate limits, cause checkout errors, or break real-time inventory sync.
Many stores end up spending extra on maintenance and rebuilding their apps later. Using the correct setup from day one prevents these hidden costs and keeps store operations stable.
Understanding Shopify’s Two Main APIs
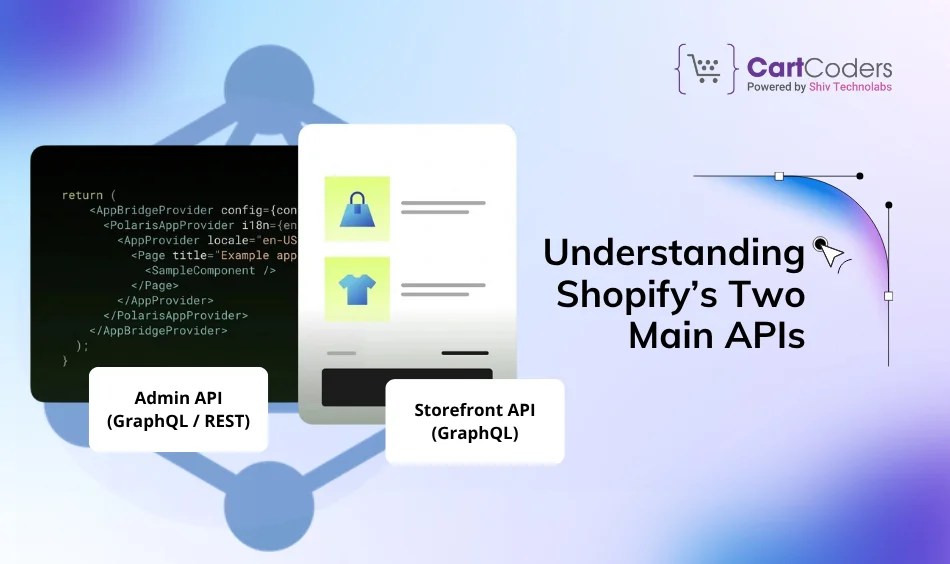
Before connecting an Android app to a Shopify store, it’s important to understand that Shopify provides two separate APIs — each built for a specific purpose. Mixing them can lead to both security and performance issues.
| API Type | Best For | Access Level | Safe To Use In |
| Storefront API (GraphQL) | Displaying products, prices, and checkout in apps | Read-only for public data | Android or iOS apps |
| Admin API (GraphQL / REST) | Managing orders, inventory, and customer data | Full store access | Secure backend server only |
The Storefront API is designed for customer-facing applications. It allows Android apps to show products, prices, and handle carts — without exposing sensitive data.
The Admin API, on the other hand, controls the store itself. It can create orders, edit inventory, and update customer records. Because of this, it should never be connected directly to a mobile app.
Understanding this split is the foundation of a safe and reliable Shopify–Android integration.
Which API to Use – And Where
A safe Shopify–Android integration depends on using each API in the right place.
Think of it like dividing your store’s data into public and private areas.
Use the Storefront API when your app needs to:
- Show products, collections, and variants
- Display stock levels or prices
- Add items to a cart
- Generate a checkout link for payment
These actions are safe for customer-facing apps because they don’t expose internal business data.
Use the Admin API only when your backend needs to:
- Manage inventory or fulfill orders
- Access customer details or invoices
- Update product data
- Sync with ERP, CRM, or accounting systems
The Admin API should live behind your secure server — never inside the mobile app.
If both APIs are used correctly, your Android app stays fast, lightweight, and fully compliant with Shopify’s security policies.
Step-by-Step: Building the Right Architecture

Step 0: Pre-flight checks
- Decide the app scope: catalog only, or catalog + cart + checkout, or deeper account features.
- Pick the checkout path: Shopify web checkout vs. custom checkout (custom needs extra approval and adds risk).
- Confirm store plan limits: features like Multipass work only on Shopify Plus.
- Create a dev store for safe testing before touching the live store.
Step 1: Create the Storefront access token
- In Shopify Admin → Settings → Apps and sales channels → Develop apps:
- Create or open your custom app.
- Enable Storefront API.
- Grant only what the app needs: products, collections, cart, and checkout.
- Generate the Storefront access token.
- Do: store the token securely in the Android app’s config.
- Don’t: add any Admin API token to the app.
Step 2: Connect the Android app to Storefront
- The app reads public catalog data: products, variants, prices, images, and availability.
- The app manages a cart with Storefront cart APIs and sends shoppers to the checkout URL.
- Benefits for owners: fast product pages, fewer support tickets from “cart broke” issues, and no exposure of private data.
- QA tips: test large images, variant switching, and slow or patchy networks.
Step 3: Stand up a secure backend (your server)
- Use any stack (Node.js, Laravel, .NET, Rails, Go).
- Keep the Admin API token on the server only (secret manager or env variables).
- Add a thin API layer for tasks the app shouldn’t do directly (orders, inventory updates, discounts).
- Access control: protect your server endpoints with auth (JWT, API keys, IP allowlist).
Step 4: Connect backend → Shopify Admin API
- The backend calls Admin GraphQL (preferred) for:
- Order management and fulfillment updates
- Inventory changes
- Discount creation and price rules
- Customer data tasks and billing documents
- Minimal scopes: request only what’s needed (e.g., orders write, inventory read).
- Version pinning: Use the latest stable API version and schedule quarterly reviews.
Step 5: Define the app ↔ backend contract
- List each backend endpoint the app will call, for example:
/orders/create(creates an order after payment success)/inventory/availability(optional, if you need tighter stock checks)/discounts/validate(optional, for promo logic)
- For each endpoint, write:
- Inputs, outputs, errors (e.g., out-of-stock, throttled).
- Rate limits and caching rules.
- Auth method the app must send.
Step 6: Add webhooks for real-time sync
- Register webhooks on your backend for events like:
orders/create, orders/updated, orders/cancelledinventory_levels/updateproducts/update(if you cache catalog data)- GDPR events (data request, redact)
- HMAC verification: verify the
X-Shopify-Hmac-SHA256header using the raw request body and your app secret. - Fail-safe: if your server is down, set a retry queue or dead-letter policy to replay missed events.
Step 7: Security hardening checklist
- Never put Admin tokens in the app.
- Use HTTPS everywhere.
- Rotate Admin tokens on a set schedule.
- Use least-privilege scopes.
- Limit backend endpoints to your app (auth + IP rules).
- Log only what’s needed; avoid storing raw PII in logs.
- Keep a data deletion path to meet privacy rules.
Step 8: Rate limits, caching, and speed
- Admin API follows a 2 req/sec average with burst capacity (leaky bucket).
- Add retry with backoff on 429 and 5xx responses.
- Cache product lists and images; warm the cache during off-peak hours.
- Batch where practical (e.g., paginate with cursors, avoid chatty loops).
Step 9: Data model tips (Storefront vs. Admin)
- Fields may differ across APIs (names, shapes, selling plans).
- Decide on a source of truth:
- Storefront for retail prices and a catalog shown to shoppers.
- Admin for operational data (cost, vendor, inventory).
- If you display stock, stick to Storefront unless strict stock accuracy is needed, then combine with a backend check.
Step 10: Testing plan (don’t skip)
- Unit tests: backend endpoints, webhook verification, error paths.
- Integration tests: full cart → checkout → order flow on a dev store.
- Load tests: small burst tests on catalog pages and cart actions.
- Network tests: simulate poor connectivity on Android.
- Rollback plan: for each release, define a quick revert step.
Step 11: Rollout strategy
- Staging first: connect the app to a staging backend and dev store.
- Phased release: start with a small user segment (internal team, VIP customers).
- Watch crash logs, check out drop-offs, and webhook error rates.
- Widen the rollout once metrics look stable.
Step 12: Monitoring and alerts
- Track:
- API error rates (429, 4xx, 5xx)
- Webhook failure counts and retry rates
- App crashes and slow screens (product list, product detail, cart)
- Check out conversions from the app
- Set alerts for spikes in errors and drops in conversion.
Step 13: Maintenance rhythm
- Quarterly: update API version, review scopes, and rotate tokens.
- Monthly: check webhook replay failures and clear dead letters.
- Weekly: skim logs for repeated user errors or slow endpoints.
- Before sales events: warm caches, raise alerting sensitivity, and validate inventory sync.
Step 14: Roles and ownership
- Android dev: app UI/UX, Storefront calls, offline states.
- Backend dev: Admin API logic, webhooks, security, and caching.
- QA: device coverage, checkout paths, refund, and cancel flows.
- Ops: monitoring, alerts, key rotations, release windows.
- Owner/PM: scope control, acceptance criteria, sign-off.
Step 15: Acceptance criteria (ready for go-live)
- No Admin tokens present in APK/AAB.
- All webhooks pass HMAC checks and log success.
- Rate-limit retries in place; no repeated 429 storms.
- Checkout completes from app to web flow without broken steps.
- Error messages shown to users are clear and helpful.
- Rollback plan documented and tested.
Quick timeline guide
- Week 1: pre-flight, tokens, Storefront wiring in the app.
- Week 2: backend scaffolding, Admin endpoints, webhooks.
- Week 3: integration, caching, rate-limit handling, QA.
- Week 4: staging rollout, monitoring, polish, phased go-live.
Security and Compliance: What Every Store Owner Must Know
Once the right structure is in place, the next focus should be security and data protection.
Every connection between your Android app and Shopify carries sensitive information — and one small mistake can expose customer or order data.
Here’s how to stay protected and compliant.
1. Keep Admin Tokens Off the App
Admin tokens are the keys to your store. If one gets exposed, anyone can access customer lists, pricing data, or modify orders.
These tokens must live only on your backend server, never inside the Android app’s code or configuration files.
If a developer or freelancer suggests embedding it inside the app, it’s a major red flag. The Storefront API is the only safe method for public Android communication.
2. Use HTTPS Everywhere
All communication — between your app, backend, and Shopify — must happen through HTTPS.
It prevents interception of customer data and ensures all data in transit remains encrypted. Shopify APIs reject unsecured connections, but enforcing HTTPS on your backend adds an extra layer of control.
3. Verify Every Webhook
Webhooks are Shopify’s way of notifying your backend about store events like new orders, refunds, or stock updates.
Each webhook includes a header called X-Shopify-Hmac-SHA256, which acts as a digital signature.
Your backend should verify this signature before processing the payload. It prevents fake or malicious requests from outside sources.
4. Request Only the Data You Need
When setting up app permissions, grant minimum scopes — such as “read_products” or “write_orders.”
As the store grows, more permissions can be added later.
Fewer scopes mean less risk if any access key ever gets compromised.
5. Stay Aligned with Shopify’s Data Rules
If your app or backend accesses customer information, Shopify requires compliance with Protected Customer Data policies.
This includes:
- Handling customer data securely
- Providing a deletion endpoint when customers request data removal
- Following GDPR or local privacy laws, depending on your region
Failing to comply can lead to app restrictions or account suspension.
6. Rotate Tokens and Monitor Usage
Access tokens shouldn’t stay active forever.
Rotating them every few months reduces risk.
Monitor the Shopify Admin → Apps → Activity log to review which tokens or apps are making calls, and revoke any unused access.
7. Protect from API Abuse
Set up throttling or rate control on your backend.
If someone tries to overload your API endpoints, the system should block or delay requests automatically.
This not only prevents downtime but also saves bandwidth costs.
8. Maintain an Incident Plan
Even with all precautions, a recovery plan matters.
Keep a checklist for:
- Revoking tokens
- Regenerating credentials
- Notifying users (if data was affected)
- Validating system integrity after any breach
Preparedness helps minimize impact and regain customer trust quickly.
A secure Shopify–Android connection isn’t just about coding; it’s about maintaining consistent protection.
These simple rules keep customer data private, store operations reliable, and your brand reputation intact.
Performance and Cost Savings You Might Overlook
The way an Android app connects to Shopify directly affects its speed, cost, and reliability. A strong setup doesn’t just protect data — it saves money and improves user experience.
1. Faster App Performance
Using Shopify’s Storefront API ensures product pages and images load quickly, even on slower networks. It’s designed for mobile apps, while the Admin API is built for backend operations.
2. Lower Maintenance Costs
Storefront connections are lighter and more stable. Apps using Admin APIs often break during Shopify updates, leading to extra developer time and fixes.
3. Better Conversion Rates
Fast load times keep customers browsing longer. Studies show even a one-second delay can lower conversions by around 7% — a direct hit on sales.
4. Scalable and Future-Ready
As catalogs grow, the same architecture easily supports new features without rebuilding the core system.
In short, using the right API split makes the app faster, cheaper to maintain, and more profitable in the long run.
Real-World Example
A mid-sized fashion brand wanted a custom Android app to match its Shopify store. Their initial developer connected the app directly to Shopify’s Admin API — thinking it would simplify catalog and order sync.
Within weeks of launch, problems started:
- Product listings loaded slowly.
- The app began hitting Shopify’s rate limits, showing empty pages during sales.
- A leaked token briefly exposed order data in analytics logs.
The brand later shifted to the correct setup — using the Storefront API for product data and a secure backend for order processing. Performance improved immediately: load time dropped by 40%, and API errors nearly disappeared.
Since then, the store’s app has scaled smoothly, handled seasonal spikes, and required minimal backend support. This switch saved months of potential rework and ongoing maintenance costs.
Conclusion
Connecting a Shopify store to an Android app is more than a technical task — it’s a decision that affects customer trust, sales performance, and long-term stability.
The wrong setup may seem faster initially, but it often leads to broken features, higher costs, and data risks later.
Using Shopify’s Storefront API for the Android app and keeping the Admin API on a secure backend creates a clean, safe, and scalable system.
This structure protects store data, improves app speed, and simplifies future updates as Shopify releases new versions.
For store owners, the takeaway is simple: A strong API foundation today prevents costly rebuilds tomorrow.
When planned correctly, a connected Android app doesn’t just reflect the store — it strengthens the entire customer experience.
FAQs
Yes, but it must be done using Shopify’s Storefront API for public data and a secure backend for Admin tasks. Direct use of the Admin API inside an app is unsafe and not recommended.
It exposes full store access to anyone who extracts the app’s code. This can lead to data leaks, unauthorized edits, or deleted products. Admin tokens should stay only on the backend.
Use the Storefront GraphQL API. It allows safe access to product data, collections, prices, and checkout URLs without exposing sensitive store details.
Shopify releases new API versions every quarter and retires older ones after a year. Always use the latest version to prevent errors when older versions are discontinued.
Webhooks are automated alerts Shopify sends to your backend when something changes — like new orders or stock updates. They keep your app data synchronized in real time.
Yes, but only Shopify Plus plans support Multipass login for single sign-on between external systems and Shopify accounts. Standard plans can’t use this feature.
Use caching for catalog data, respect rate limits (around 2 requests per second average), and handle retries properly in the backend. Avoid making unnecessary Admin API calls from the app.
Yes, but confirm they follow Shopify’s best practices — separate Storefront and Admin APIs, secure token handling, and HMAC verification for webhooks. Always review their integration plan before deployment.
Create a development store, connect it to your app, and test all flows — product load, checkout, order sync, and error handling — before using the live store credentials.
Because the consequences of a weak setup — lost data, customer distrust, and downtime — directly affect business results. Understanding how integrations work helps owners make safer technical decisions.


