Adding the Meta Pixel (formerly known as Facebook Pixel) to your Shopify store is one of the best ways to utilize the power of Facebook ads. The Pixel tracks actions people take on your website, allowing you to reach those individuals again with targeted ads on Facebook and Instagram.
Once the Pixel is installed, you’ll gain access to features like custom audiences, lookalike audiences, and conversion tracking. You can identify the most effective ads that generate the highest sales and optimize your campaigns for the best results.
Track Every Click. Understand Every Customer.
Add Meta Pixel to your Shopify store and make every ad count.


The good news is that adding the Meta Pixel to your Shopify store is straightforward. This step-by-step guide will assist you in installing the Meta Pixel on your Shopify store within a few minutes.
3 Ways to Install Meta Pixel on Shopify
There are 3 reliable methods to install Meta Pixel:
- Using Shopify’s Facebook & Instagram App (Recommended)
- Manual Installation via Theme Code
- Installing via a Shopify App
Method 1: Shopify’s Facebook & Instagram Channel
This is the simplest and most reliable method.
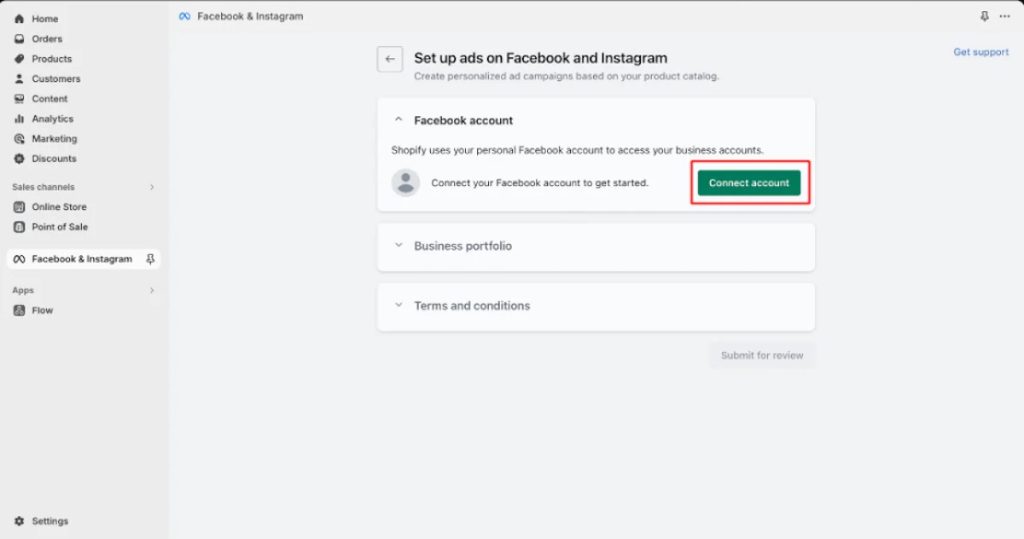
Step-by-Step:
- Go to your Shopify Admin.
- Click “Sales Channels” → “Facebook & Instagram” → “Settings”.
- Connect your Meta Business Manager, Ad Account, and Pixel.
- Shopify will automatically embed the Meta Pixel on all pages.
✅ Bonus: This also enables Facebook Shop and Instagram Shopping with minimal setup.
Also Read: How to Add Google Search Console to Your Shopify Store
Method 2: Manual Installation of Meta Pixel on Shopify
This method is for those who prefer direct control.
Step 1: Create Your Pixel
- Visit the Meta Events Manager.
- Click “Connect Data Sources” → Choose “Web”.
- Select “Meta Pixel” → Click “Connect”.
- Name your Pixel → Add your store URL → Click “Continue”.
- Choose “Install Code Manually” and copy the generated Pixel code.
Step 2: Add the Code to Your Theme
- Go to Online Store > Themes in Shopify Admin.
- Click Actions > Edit Code for your live theme.
- Under Layout, open the theme.liquid file.
- Paste the Pixel code just above the closing </head> tag.
- Click Save.
Make sure you include the entire <script> code. Replace the PIXEL_ID placeholder with your real Meta Pixel ID.
Method 3: Using a Shopify App to Add Meta Pixel
This is ideal for store owners who want multiple pixels, conversion API support, or easier management.
✅ Recommended Apps:
1. Trackify X Facebook Pixel
- Add multiple Meta, TikTok, and Snapchat Pixels.
- Includes server-side Conversion API.
- Advanced analytics and event tracking.
- View App → https://apps.shopify.com/trackify-1
2. FBTrack – Facebook Pixels App
- Add up to 10 Meta Pixels with collection-specific setup.
- Conversion API support included.
- View App → https://apps.shopify.com/facebook-pixel-conversion-api-fbtrack
These apps also bypass browser restrictions by using Meta’s Conversion API, improving tracking accuracy.
accurate tracking of your store’s events, page views, and product catalog. Be sure to check in regularly to make sure your Facebook Pixel is working properly.
Why You Need the Meta Pixel on Your Shopify Store?
Adding the Meta Pixel to your Shopify store is one of the best ways to boost your Facebook ad performance. Here’s why you need it and how to set it up:
It Helps You Optimize Your Facebook Ads
The Pixel collects data about your visitors and customers, such as their age, location, and behavior on your site. Facebook uses this information to optimize your ad targeting and bids to reach high-intent audiences. The more data the Pixel gathers, the better it can refine your ads.
It Enables Retargeting to Bring Visitors Back
The Pixel allows you to create audiences of people who visited your store but didn’t make a purchase. You can then show them ads to bring them back. Retargeting is one of the most effective Facebook ad strategies with high conversion rates.
It Unlocks More Facebook Ad Features
The Pixel is required for key ad features like Dynamic Ads, which automatically promote your products to interested shoppers. It’s also needed for offline conversion measurement, so you can see how your ads influence in-store sales.
Check out: Quick Tips Shopify SEO Tips to Increase Google Ranking
How to Verify that Meta Pixel Is Working?
To confirm that the Pixel is active:
- Install the Meta Pixel Helper Chrome extension.
- Open your Shopify store in a new tab.
- Click the Pixel Helper icon in your browser.
- You should see events like PageView, AddToCart, or Purchase.
If not, double-check your installation method or consult the app’s support team.
Troubleshooting Common Issues with the Meta Pixel on Shopify
Once you’ve installed the Meta Pixel on your Shopify store, you may encounter some common issues that prevent it from tracking properly. It’s advisable to partner with an experienced company like CartCoders to avoid such recurring issues.
However, here are a few troubleshooting tips to help get your Meta Pixel working smoothly in case you don’t have a team to guide you:
Uncheck Customer Privacy Settings
If you’re seeing errors about Facebook not being able to track certain actions or page views, it may be due to your store’s customer privacy settings.
Go to Settings > Customer Privacy and ensure that Facebook tracking is enabled. This will allow Facebook and other services to collect data from your store.
Fix Loading Errors
If you see errors mentioning the Meta Pixel failed to load, it typically means there’s an issue with the installation.
Double-check that you’ve installed the latest version of the Meta Pixel app and that the Pixel code is placed directly after the <head> tag on all your theme templates.
You may need to reinstall the app to resolve loading issues.
Resolve Product ID Matching Issues
One of the most common problems with the Meta Pixel is improper product ID matching.
This occurs when the Meta Pixel can’t match the product IDs from your product catalog to the products on your website.
Go to your Meta Pixel dashboard, select the Catalog tab, and check that all your products are showing under “Matched Products.”
For any products showing as “Unmatched,” double-check that the Meta product ID and Shopify product ID are the
Final Thoughts
Whether you’re just starting or scaling your ad campaigns, installing Meta Pixel correctly gives you the insights you need to make smart decisions. From Shopify’s official integration to advanced tracking apps, you have options depending on your goals.
At CartCoders, we help brands integrate analytics, tracking, and performance tools seamlessly into their Shopify stores. If you’re looking for hands-on help with setup, custom events, or performance tuning, we’ve got you covered.


